Studio
How to turn phone scans into one PDF under 2 MB
An upload form wants one PDF under a size limit, but your documents are a handful of phone photos. This guide covers shooting the pages, combining them, hiding personal data and fitting the file under the limit.
- HNarzędzia editorial team
- Published:
Online forms at Polish offices, universities and employers often ask for a single PDF and cap its size, for example at 2 MB. Your documents are more likely to be several phone photos of a few megabytes each, plus a PDF application. Document Studio turns them into one PDF: it straightens photographed sheets, lets you set the page order, black out an ID number, bank account or address, and then picks a quality that fits the size limit. Everything runs in your browser, and your files are not uploaded.
Size limits on upload forms: weight, format and number of files
Before you scan anything, check three things on the form: whether the limit applies to one file or to all attachments together, which formats it accepts (often PDF only) and how many files you can add. That tells you whether you need one PDF or several.
Limits vary. A page from a Polish county office describing the ePUAP electronic inbox (the national government platform for sending documents to Polish offices) gives 5 MB for the whole electronic document including attachments and 3.5 MB for an attachment added from your computer (checked in October 2026). Other services set their own numbers, so the text next to the upload field is what counts. This guide uses 2 MB as the example. Studio has ready-made limits of 500 KB, 1 MB, 2 MB, 5 MB and 10 MB, and a custom limit from 10 KB to 100 MB.
Studio counts 1 KB as 1000 bytes, the way most upload forms do. Windows reports file sizes in units of 1024 bytes, so the same file can show a smaller number there than on the form.
How to photograph a document with your phone
How good the PDF looks depends mostly on the photo. Studio fixes the perspective and the background, but it cannot add sharpness.
- Put the sheet on a dark, plain surface. Studio looks for a light sheet on a darker background. On a white desk, or with part of the sheet cut off by the frame, edge detection can fail. The photo is then kept whole and you set the corners by hand.
- Fit the whole sheet in the frame with a narrow strip of table around it. A sheet that fills only a small part of the photo has few pixels, and Studio warns when the resolution falls below about 110 DPI at print size.
- Arrange the light so that the shadow of your phone and hand does not fall on the page. Daylight from the side usually gives fewer shadows. “Background whitening” brightens grey paper and a light shadow, but it will not rescue a dark photo.
- Hold the phone above the sheet as level as you can. Studio corrects the perspective, so a photo taken at an angle still works, but the smaller the angle, the less it has to fix.
- Photograph each page separately. You set the order later in Studio. iPhone photos in HEIC format can be added without converting them.
We cover shooting and the single-photo scanner in How to scan a document with your phone.
Document Studio step by step
The example project is an application in PDF (two pages) and four photos of A4 sheets taken at an angle on a table, one of them in poor light. The documents are made up (Anna Nowak, a sample PESEL and an invented address), and the photos are test photographs of sheets, not scans of real documents. PESEL is the Polish national ID number. The photos weigh 4.7 MB in total.
1. Add photos and PDF files
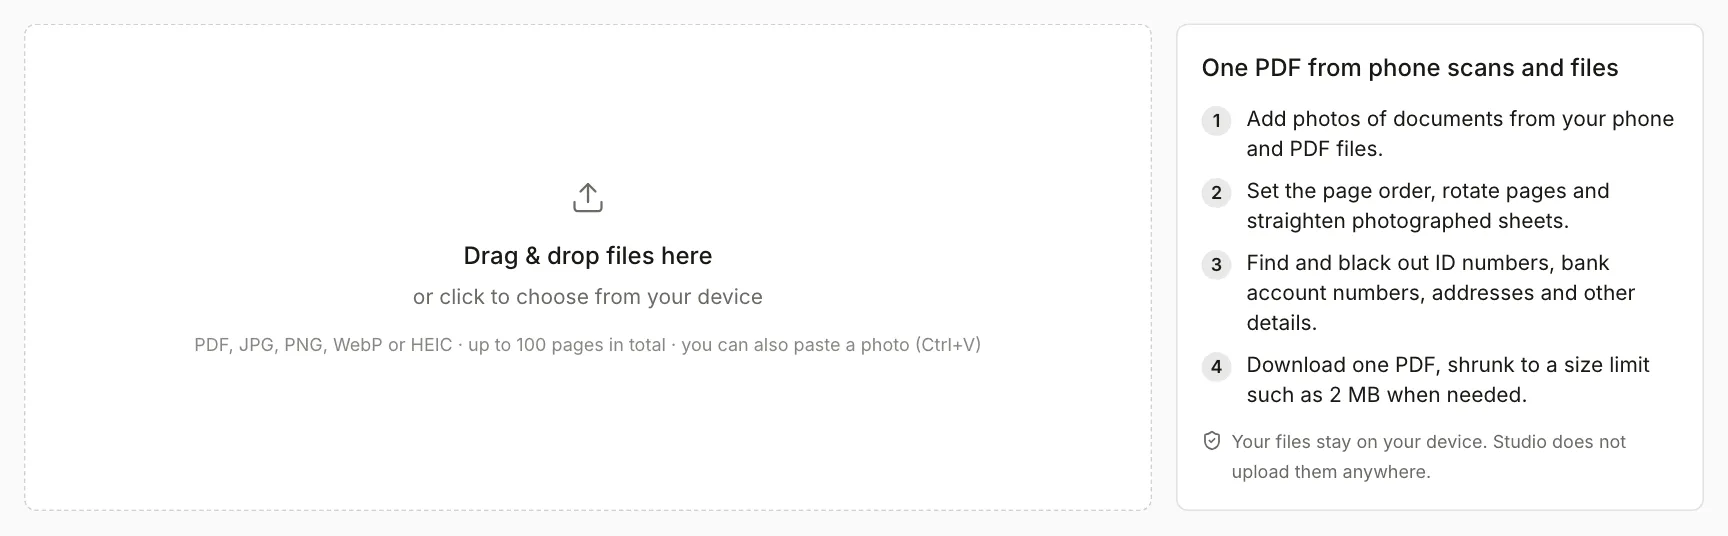
Open Document Studio, then drag files onto the field, choose them from your device or paste a photo with Ctrl+V. Studio accepts JPG, PNG, WebP and HEIC (up to 50 MB each) and PDF (up to 200 MB), up to 100 pages in total. Every photo and every PDF page becomes a separate page in the project. A password-protected PDF opens once you enter the password, and the finished file has no password.
Once you add files, Studio opens full screen. “Close Studio” closes it, and “New project” removes all pages. The project stays in this browser tab and disappears when you close the tab.
2. Put the pages in order
The page list is on the left, the preview in the middle and the settings on the right. Drag pages with the mouse, or use the Up and Down arrows on a selected page (Alt with an arrow moves it in the list). Above the preview you can rotate a page by 90° either way or use “Remove page”. Each page shows its file name, its type (“photo” or “PDF · p. 1”) and any notes.
You can widen the page list and the settings panel by dragging their edges. Each panel collapses with the button in its header (“Collapse page list”, “Collapse settings”) to give the preview more room.
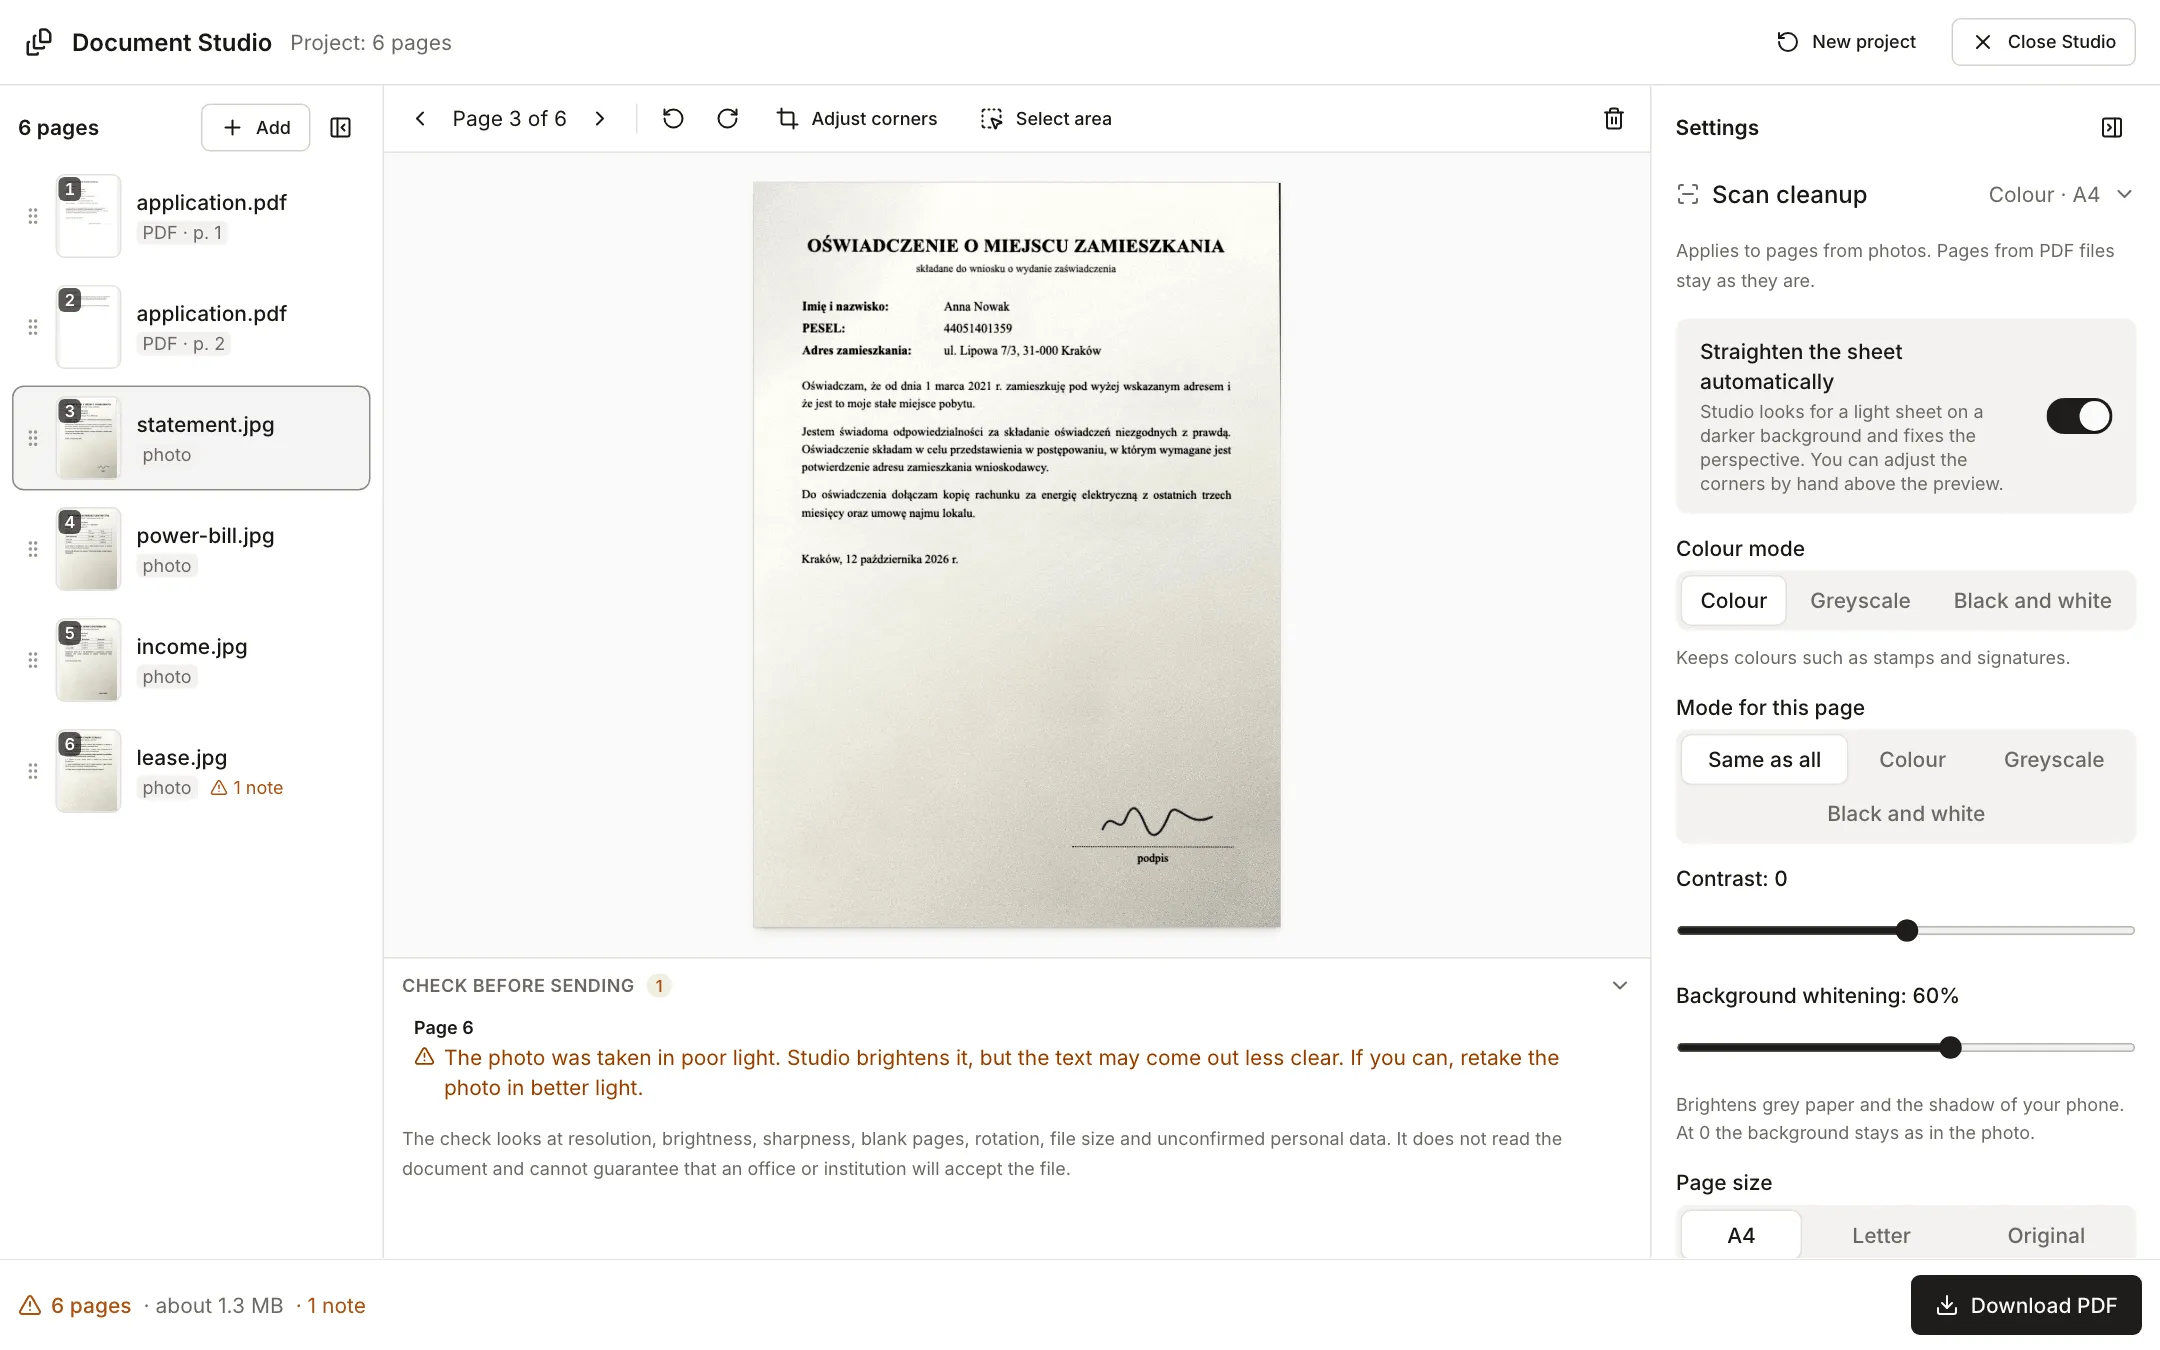
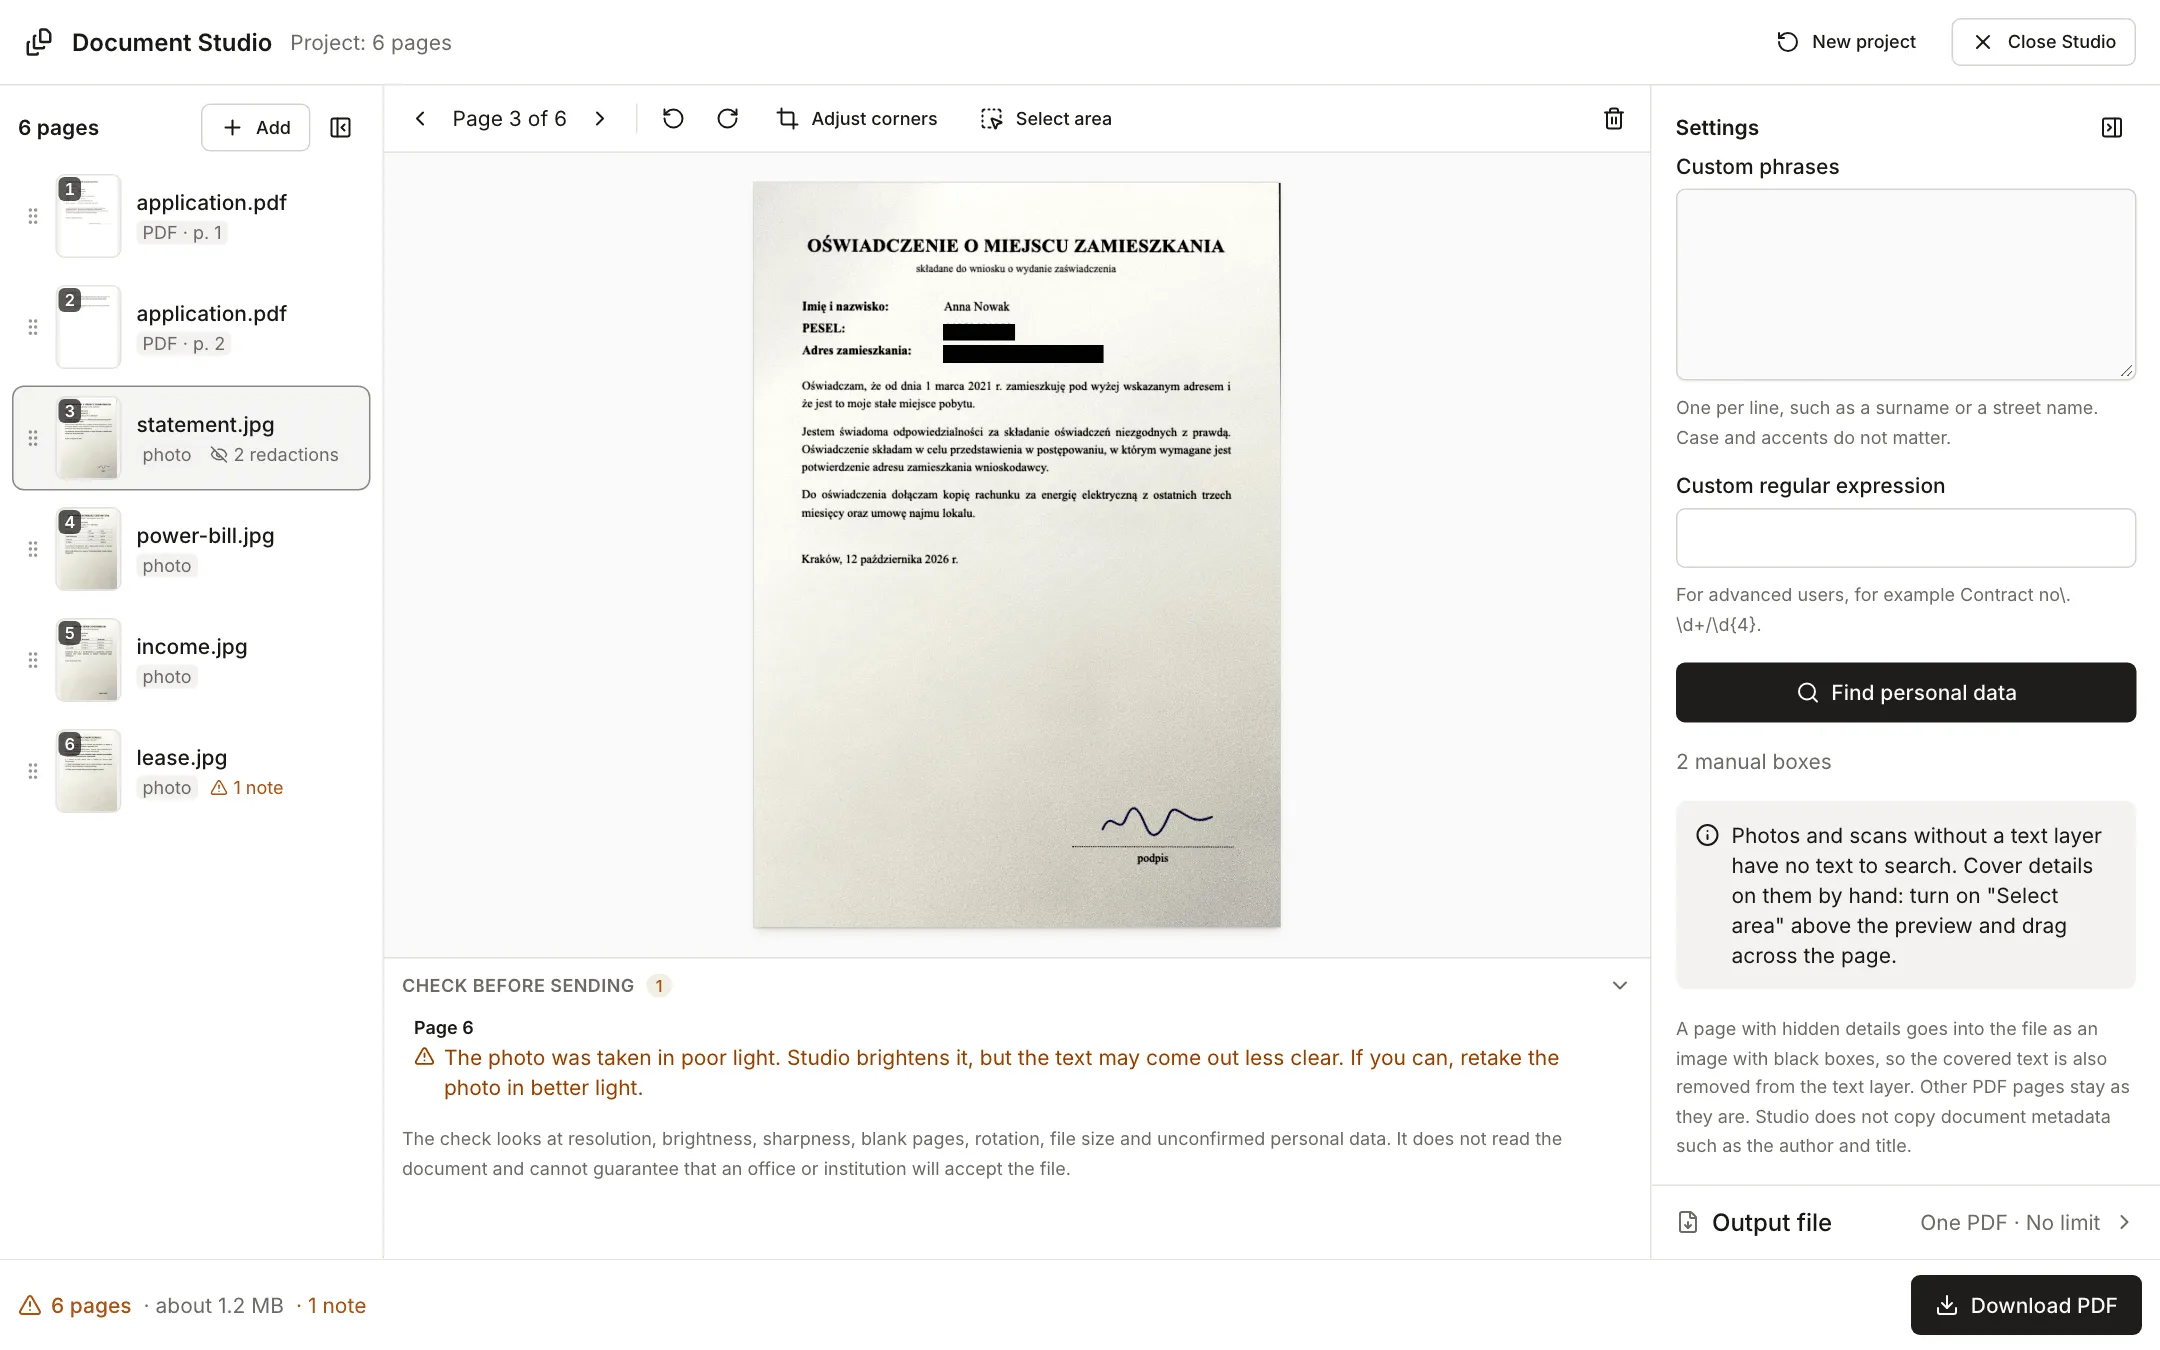
The statement in the screenshot lay at an angle on a wooden table. Studio found the sheet and straightened it to an A4 page. The bottom bar shows the number of pages and an estimated size: about 1.3 MB for this project.
3. Straighten the photos and pick a mode
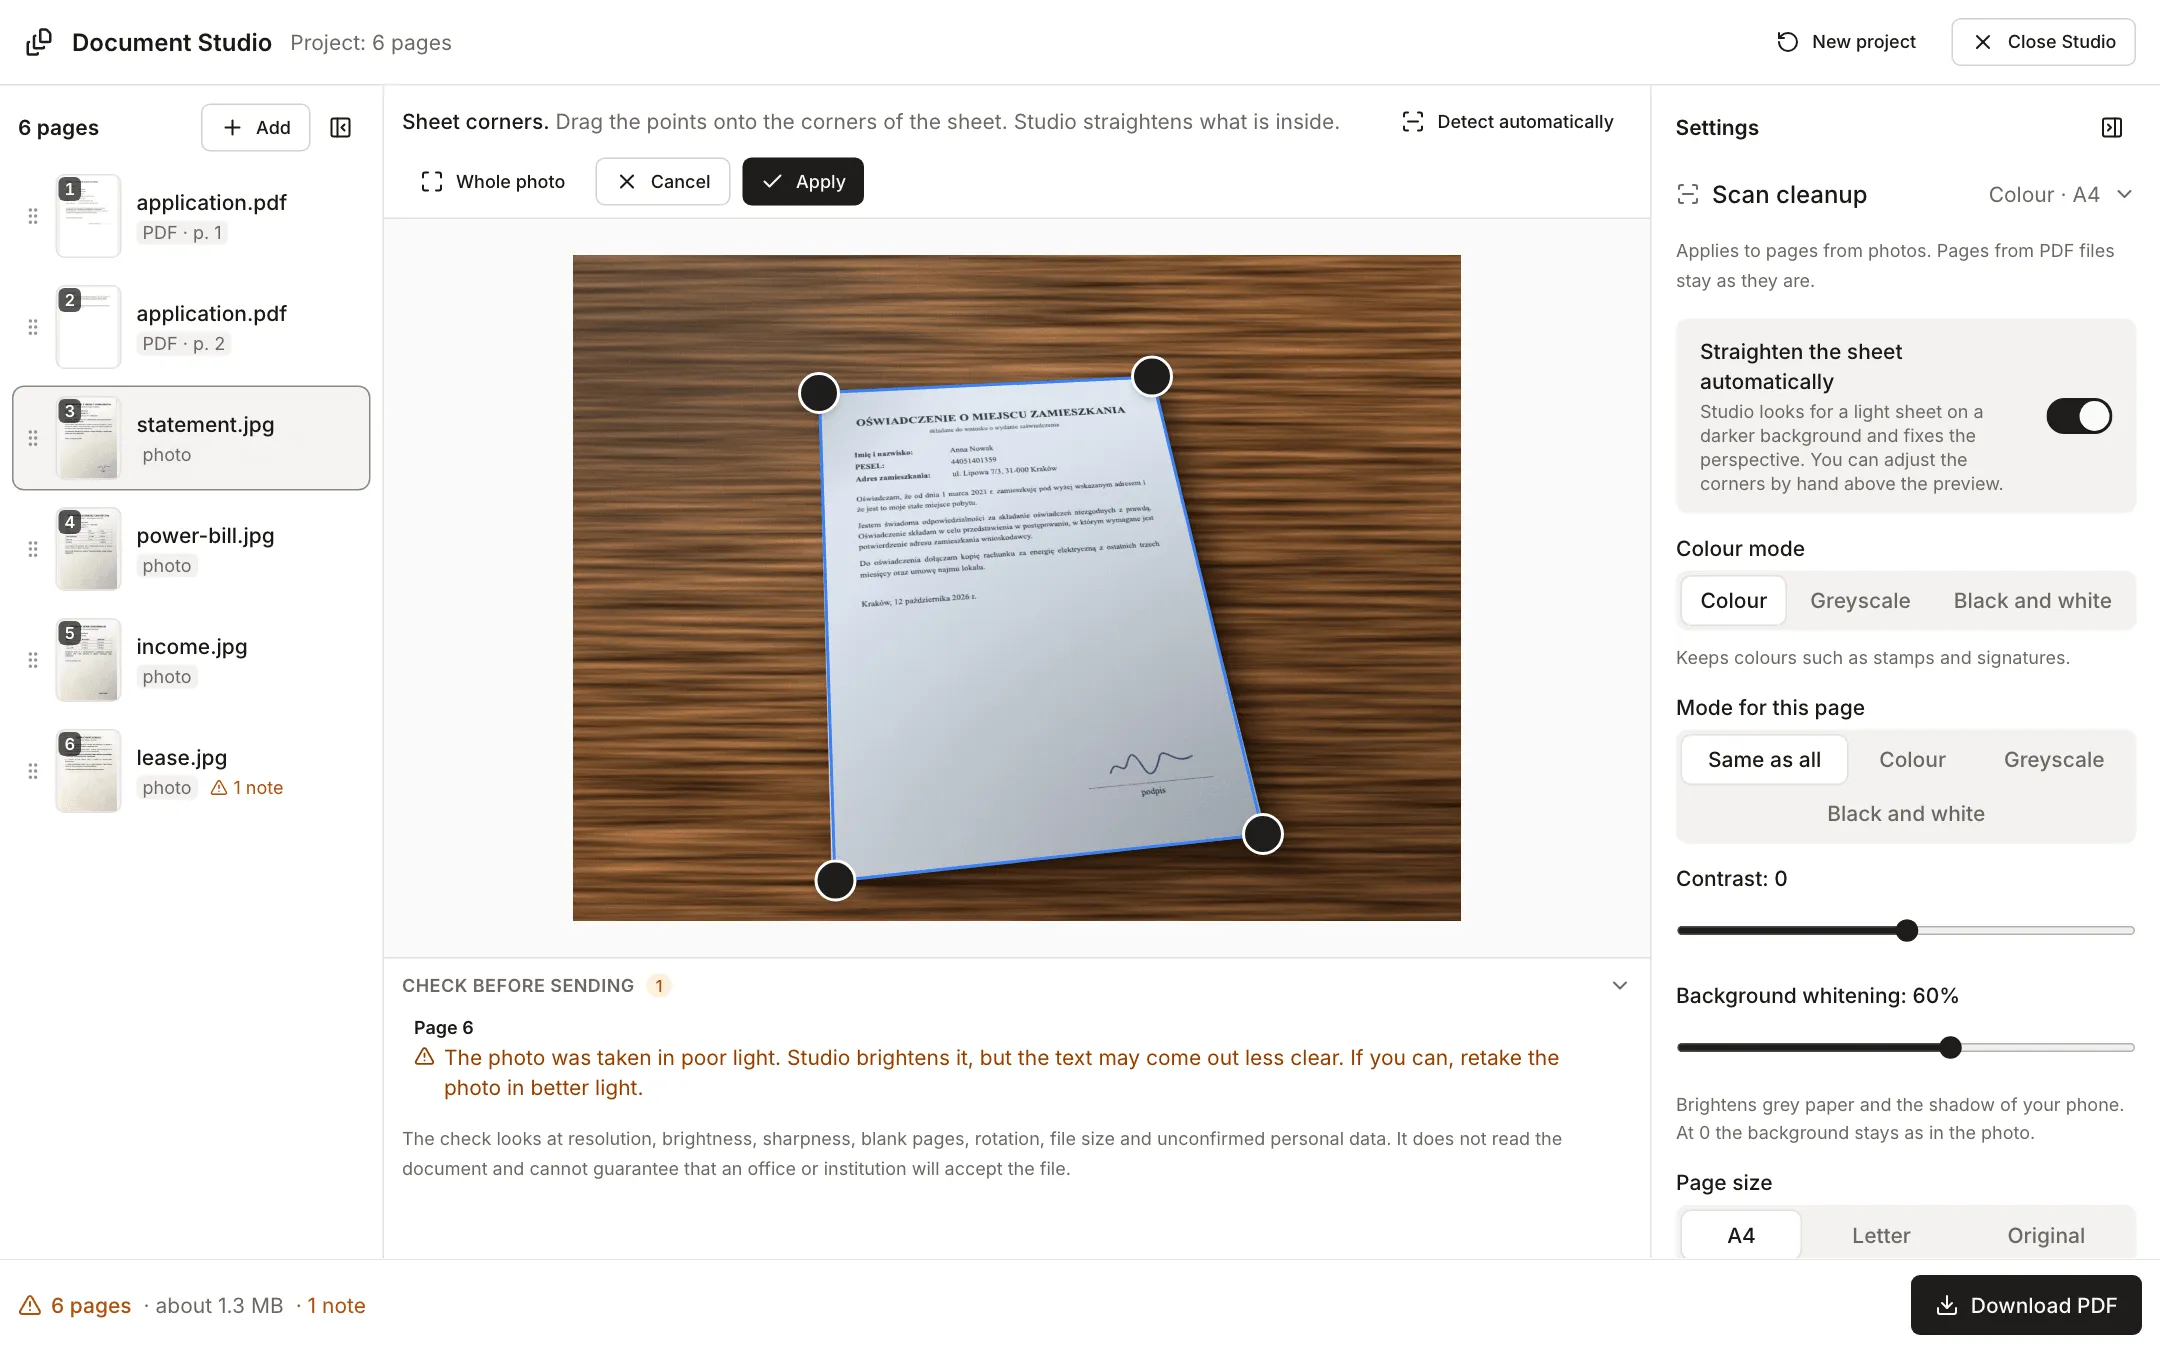
The “Straighten the sheet automatically” switch is on by default. When Studio cannot find the edges of the sheet, it keeps the whole photo and adds the note “The edges of the sheet were not found”. Click “Adjust corners” above the preview, drag the four points onto the corners of the sheet and confirm with “Apply”. “Detect automatically” goes back to the detection result, and “Whole photo” puts the points on the edges of the photo.
The “Scan cleanup” section has these settings:
- “Colour mode”: “Colour” keeps stamps and signatures, “Greyscale” gives a smaller file, and “Black and white” keeps only the text on a white background for the smallest file, but shades disappear (an ID photo, for example). “Mode for this page” sets a different mode for one page.
- “Contrast” from -50 to 50 and “Background whitening” from 0 to 100% (60% by default). Whitening brightens grey paper and the shadow of your phone. At 0 the background stays as in the photo.
- “Page size”: A4, Letter or “Original”. A sheet with proportions close to the page fills it, and a smaller document, such as an ID card or a receipt, is centred on the page with a 10 mm margin.
These settings apply to pages from photos. Pages from PDF files stay as they are. The mode affects the size: for our project the bottom bar showed about 1.3 MB in colour, about 1.2 MB in greyscale and about 627 KB in black and white.
4. Hide personal data
You cover data in the “Hide personal data” section. How you do it depends on the kind of page.
PDF pages with text
Studio searches the text and finds the data for you. “What to look for” has these ticked by default: first and last name, PESEL, NIP (Polish tax ID), bank account, ID card and passport number, email, phone, address, postcode and date of birth (REGON, the business ID, is off). The search is built for Polish documents. You can add your own phrases and a regular expression. After you click “Find personal data”, matches appear in the list and in the preview as yellow boxes. Each starts as “pending”, and you change it to “hidden” or “visible”. “Hide all pending” and “Keep all pending” work on all of them at once. You can also toggle a match by clicking it in the preview.
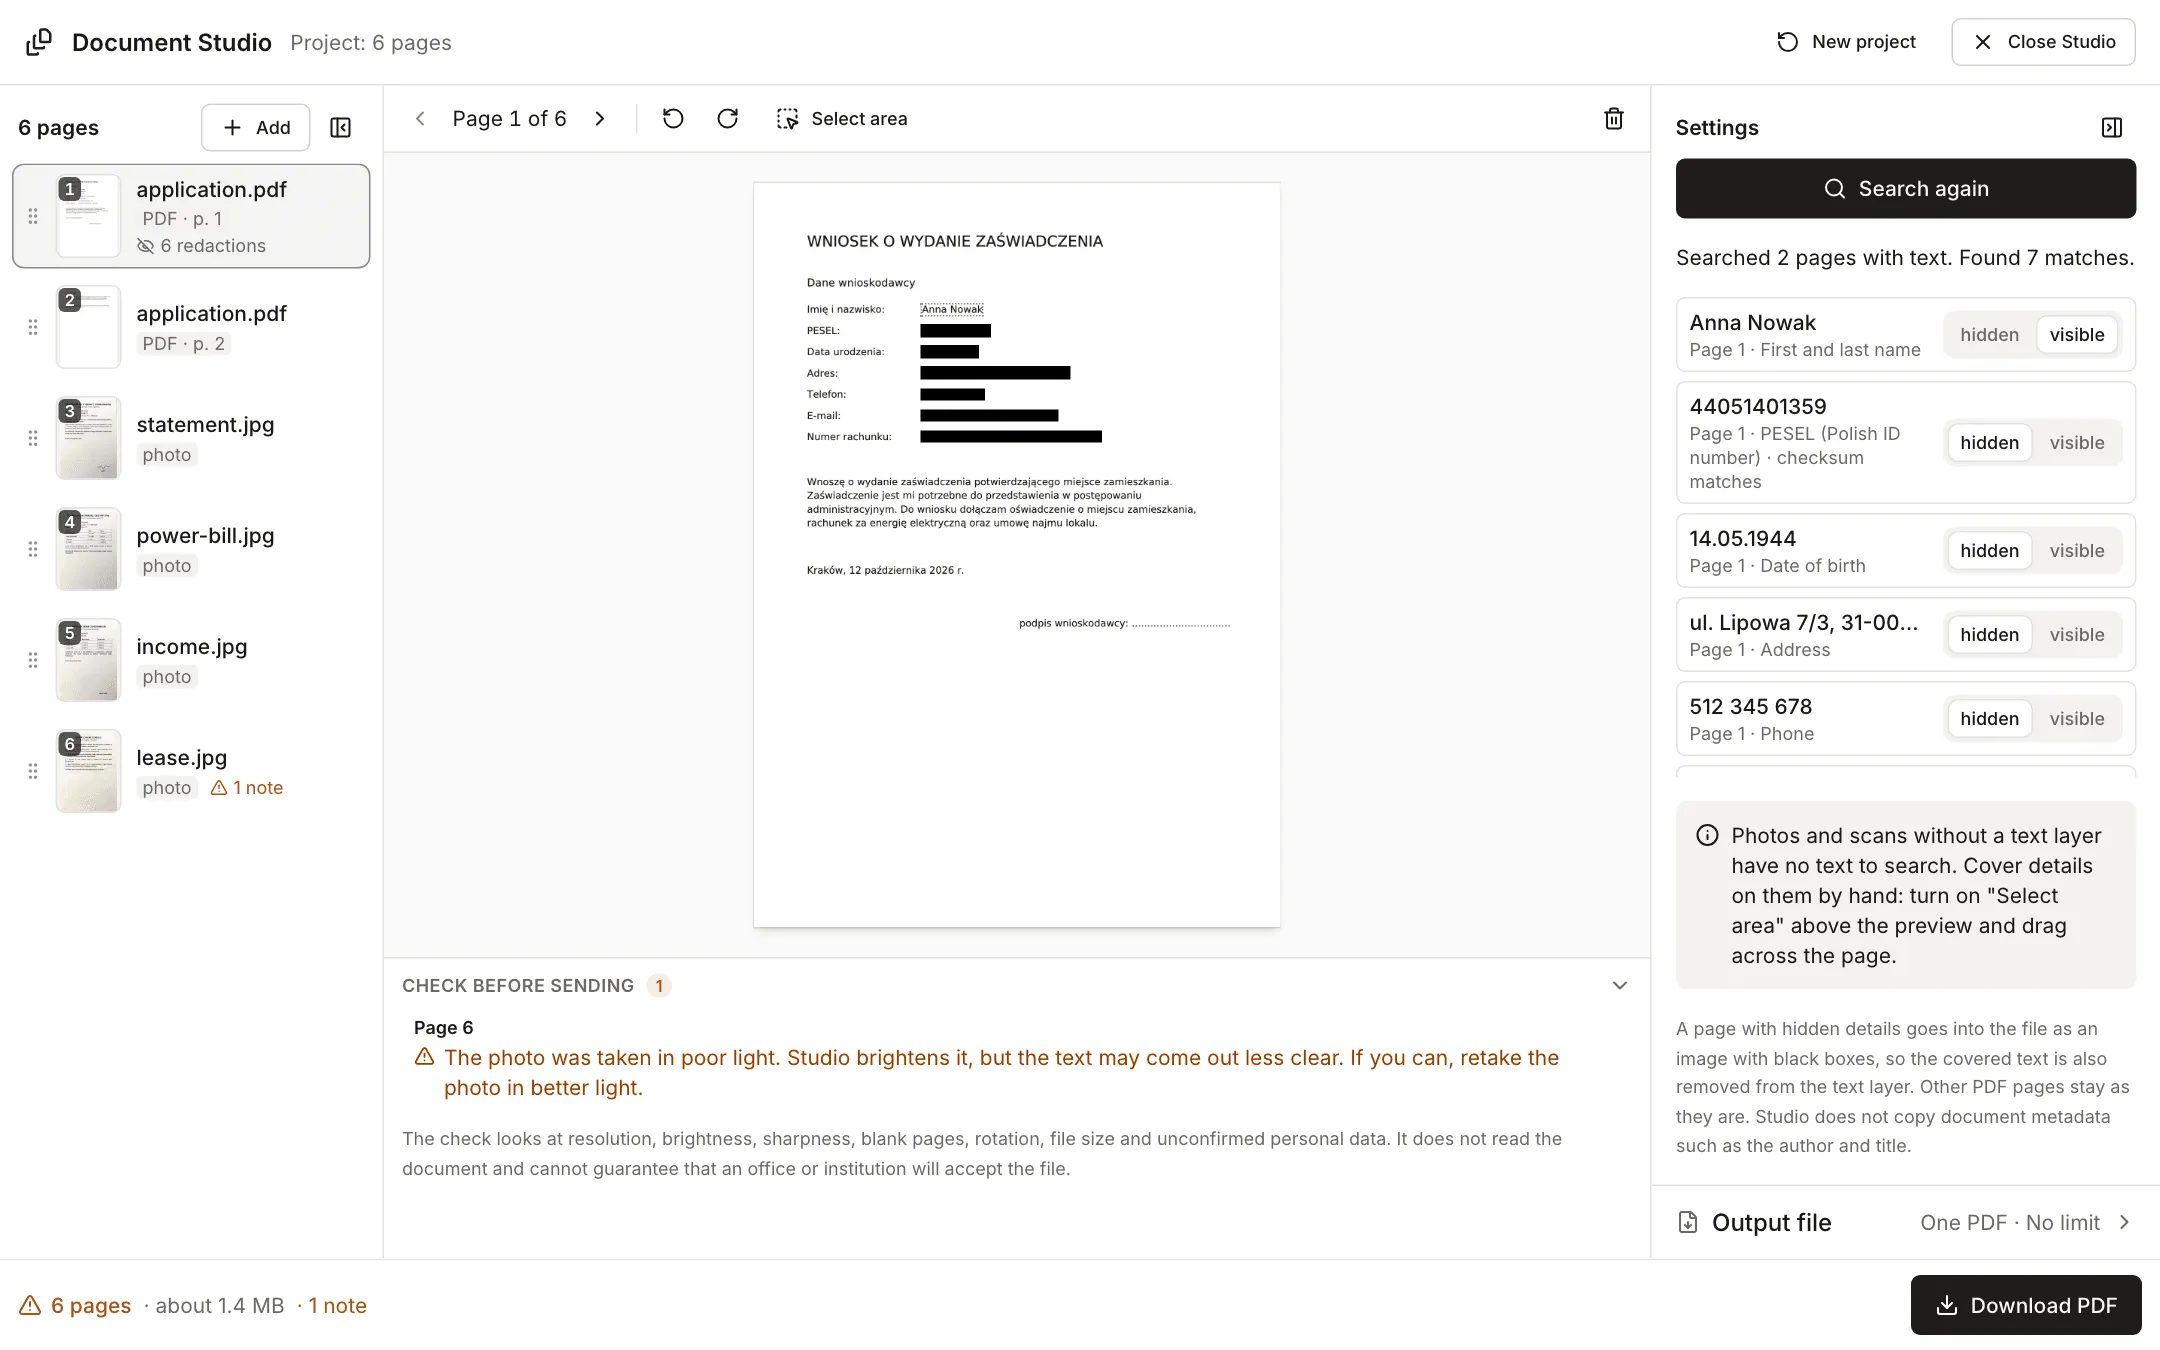
On the first page of the application Studio found 7 matches. In the example the PESEL, date of birth, address, phone, email and account number are covered. The name stays visible, because the application makes no sense without it. For the PESEL the list notes that the checksum matches. Matches you do not decide on stay visible, and the “Check before sending” list reminds you about them.
A page with hidden data goes into the finished file as an image with black boxes, so the covered text also disappears from the text layer. In our test the finished file with the confirmed matches behaved like this: no text could be copied from the first page of the application, and the second page kept its selectable text. Studio also does not copy document metadata such as the author and title.
Photos and scans
A photo has no text layer, so there is nothing to search. Turn on “Select area” above the preview and drag across the part that should disappear. While selection mode is on, you can remove a black box with the cross in its corner.
5. Choose a size limit and read “Check before sending”
In the “Output file” section enter a file name and pick a limit under “Fit within a file size limit”. When you download, Studio chooses the resolution of pages saved as images (72 to 200 DPI) and the JPEG quality so that the file fits the limit at the best quality it can manage. “Quality of pages saved as images” (Smaller file, Standard, High) applies without a limit; with a limit Studio lowers the quality itself when it has to. PDF pages where you hide nothing stay unchanged and keep their text. The switch “If the file does not fit, also turn PDF pages into images” shrinks them as a last resort, but you can no longer select their text.
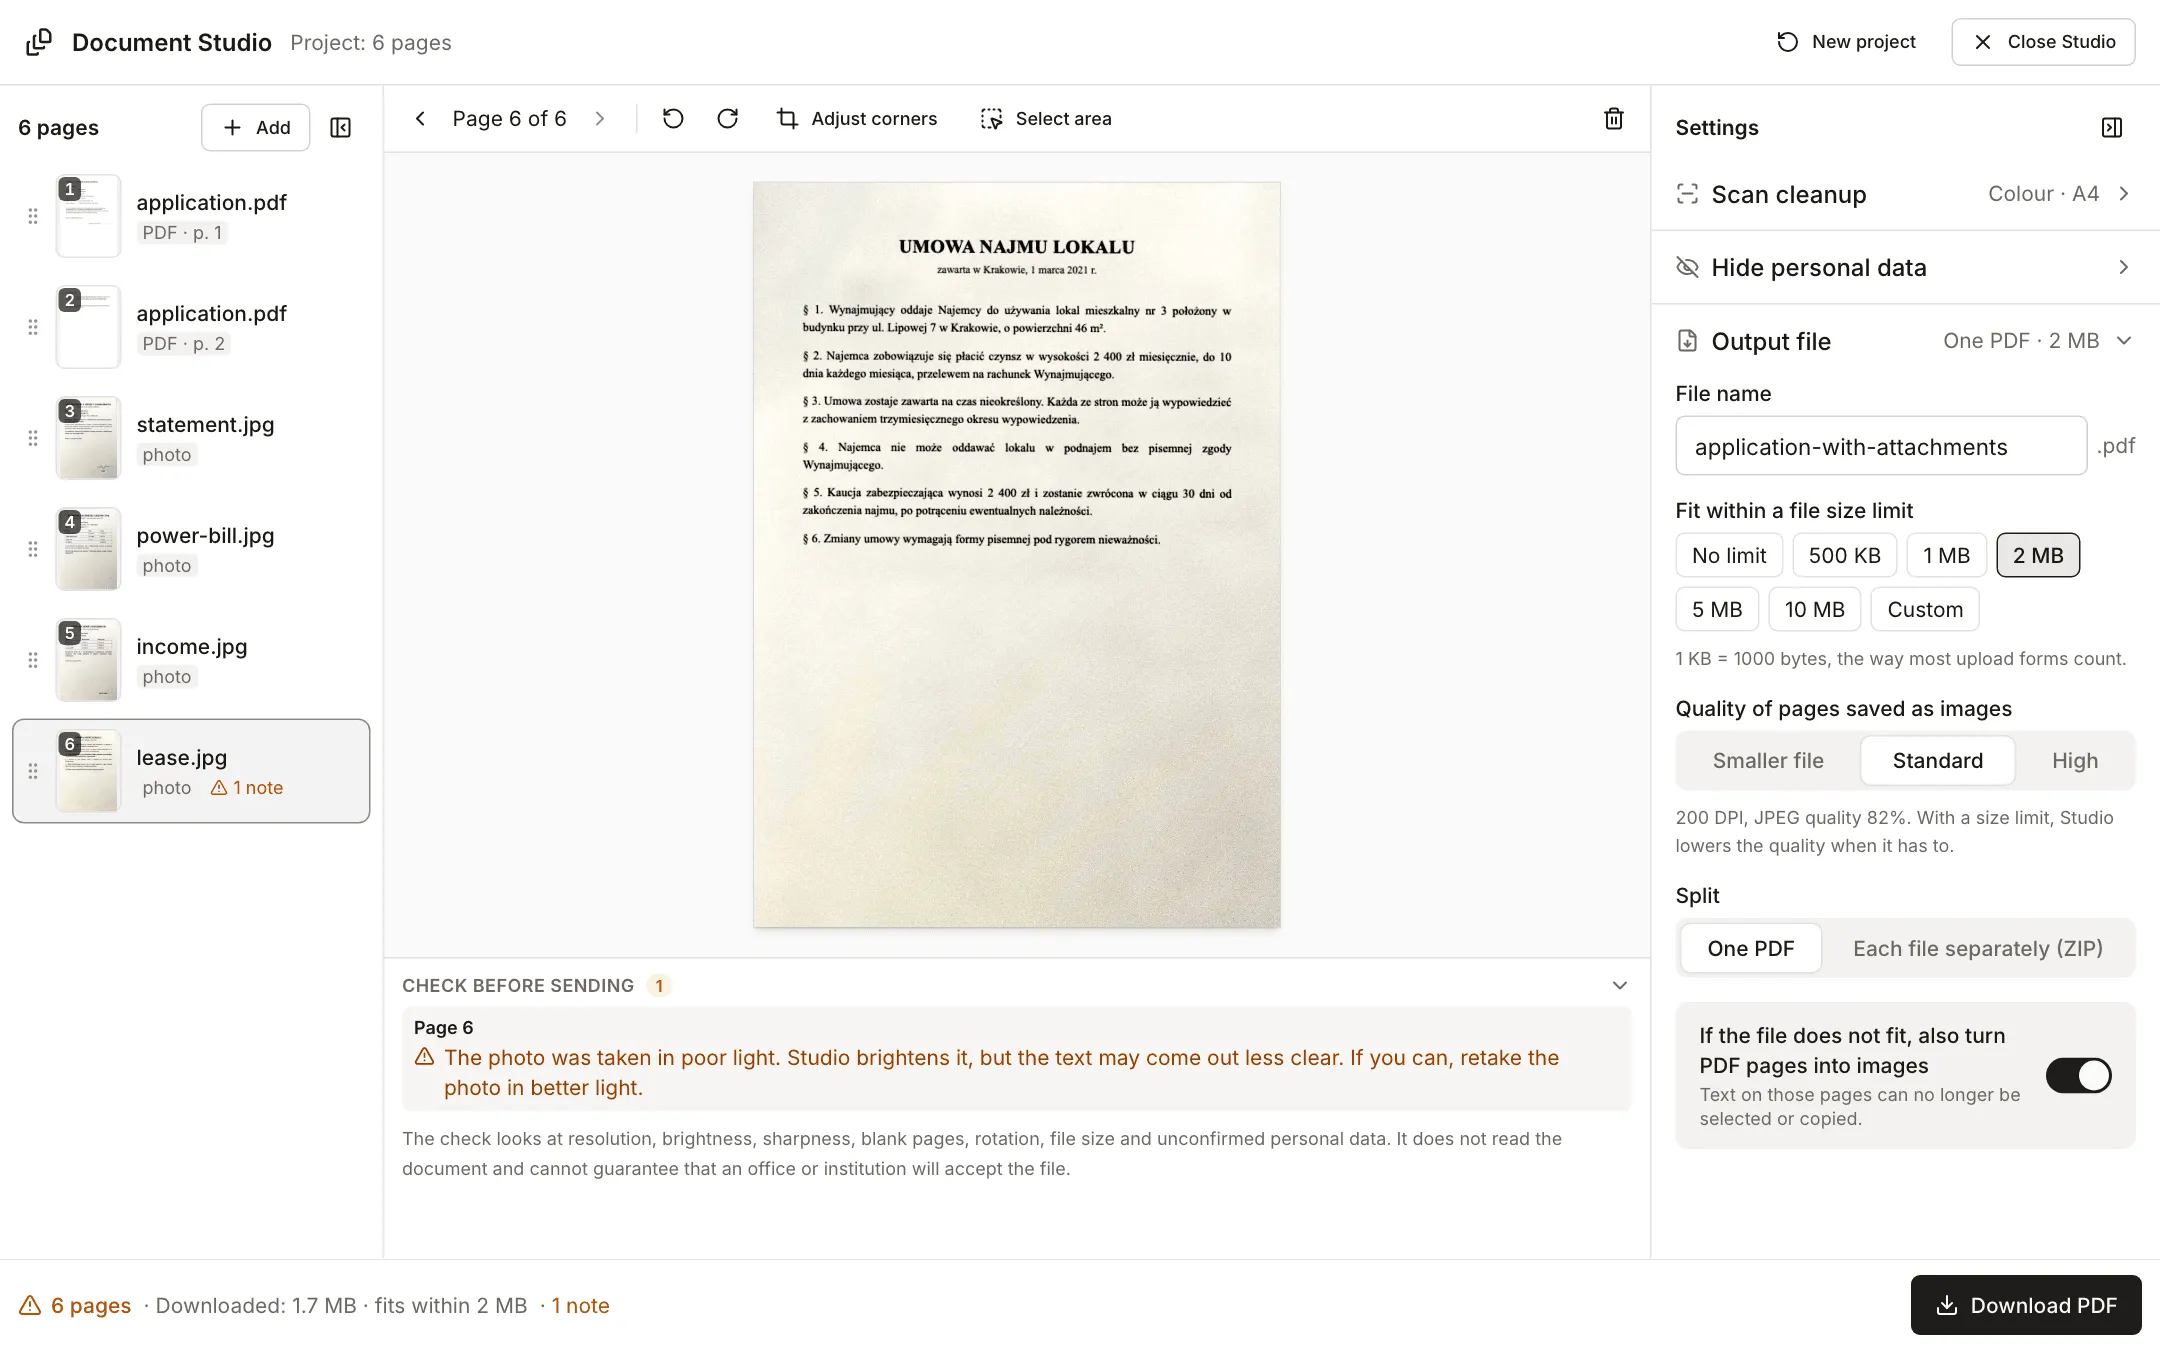
This is what came out for our project (four photos from 586 KB to 1.4 MB and a two-page PDF, colour mode, no data hidden):
| Setting | Size of the downloaded file |
|---|---|
| No limit | 1.3 MB |
| 2 MB limit | 1.7 MB |
| 1 MB limit | 959.5 KB |
| 500 KB limit | 482.2 KB |
With the 2 MB limit the file came out larger than with no limit, because Studio looks for the best quality that still fits. After hiding all seven matches on the application page, the same 2 MB setting gave 1.9 MB, since a page saved as an image is heavier than a page with text. Your sizes will differ, because they depend on your photos.
Under the preview, “Check before sending” lists notes about the pages: low resolution (below about 110 DPI at print size), dark or blurry photos, blank pages, pages rotated differently from the rest, missing sheet edges, unconfirmed data and a file above the limit. We have one note: the lease photo on page 6 is dark. Studio brightens such a photo, but the text may come out less clear, so the note stays whatever the background whitening setting. The likeliest fix is to retake the photo in better light. If the file does not fit even at the lowest settings, Studio says so. Removing some pages, using black and white or splitting into separate files helps.
“Download PDF” saves one file. With the split “Each file separately (ZIP)” the button becomes “Download ZIP” and each file you added goes into its own PDF in the archive. The size limit then applies to each of them.
What Document Studio does not do
- It does not recognise text on photos and scans, so it cannot find a PESEL in a photo. You cover data on photos yourself with “Select area”. Pages from photos and pages with hidden data are images: you cannot select or copy their text. For text recognition use OCR PDF, and for files without a text layer see Why you can’t select text in a PDF.
- It does not know data outside its rules. Enter a contract number or a company name as your own phrase or regular expression.
- It does not guarantee that an office will accept the file. The check looks at resolution, brightness, sharpness, blank pages, rotation, file size and unconfirmed data. It does not read the document. Check the form’s requirements for format, size and number of files.
- The finished PDF is a new file, so digital signatures from the PDFs you added stop working in it. Add an electronic signature last, once the file is ready.
When to use the single tools instead
Studio pays off when you have several photos and files and the form takes one PDF under a size limit. For a single step, a separate tool is enough:
- one photo of a sheet to PDF: Document scanner or JPG to PDF,
- several ready PDFs into one: Merge PDF,
- a PDF too big for a form: Compress PDF to a target size,
- hiding data in a PDF with no other changes: Redact PDF,
- a handwritten signature on a finished file: Sign PDF.
Email attachment limits and the order of steps before you send are in How to prepare a PDF for email. Product photos for listings are covered in How to prepare product photos for Allegro, OLX and Vinted.