Studio
How to prepare product photos for Allegro, OLX and Vinted
Allegro, OLX and Vinted each have their own rules for listing photos, and phone photos rarely match them. This guide shows what each marketplace requires, how to shoot the product, and how to prepare a whole set at once.
- HNarzędzia editorial team
- Published:
If you sell in Poland, you will probably list on Allegro (the largest online marketplace, similar to eBay), OLX (classified ads) or Vinted (second-hand clothes). Allegro wants the first photo on a pure white background, while OLX and Vinted set their own limits and recommendations. Phone photos usually come with different backgrounds, proportions and distances, and fixing them one by one takes time. Seller Studio lets you batch edit product photos (up to 30 at once) in your browser, and the photos are not uploaded to a server. Before you open it, it helps to know what the marketplaces ask for and how to shoot photos the tool can work with.
Allegro photo size, OLX limits and Vinted rules
The table separates three things: what the marketplace requires, what it only recommends, and what Seller Studio sets for you. Requirements and recommendations come from each marketplace’s help pages (as of October 2026). Where a marketplace gives no value, the setting is our default and you can change it. The OLX and Vinted pages are in Polish.
| Marketplace | Requirement | Recommendation | Seller Studio setting |
|---|---|---|---|
| Allegro | Photo 1 (the thumbnail) on a plain white background, RGB 255, 255, 255, with no frames, text, shop logo or watermark. Long side at least 500 px, JPG or PNG, any aspect ratio. 10 photos on a personal account, 16 on a business account. From photo 2 on, the background can be anything (thumbnail rules, in Polish). | sRGB colour profile. | 2000×2000 px, square, JPG, white background, 6% margin, logo off. |
| OLX | JPG, JPEG or PNG, up to 5 MB and 5000×5000 px per photo. Usually 8 photos, 12 in some categories, 16 for accommodation. No photos from the internet, no manufacturer photos, no contact details in the photo. | A light, plain background with the item in the centre and not much empty space (tips for good photos). | 1600×1200 px (4:3), JPG, white background, 6% margin, file within 5 MB. |
| Vinted | Up to 20 photos, no watermarks or stock photos. The catalogue rules do not allow photo editing (Catalogue Rules, UK version). | Neutral background, daylight, no filters, show any flaws. The first photo shows the whole item, with no collages (photo tips, in Polish). | 1200×1600 px (3:4), JPG, original background. |
| Shopify (own shop) | File under 20 MB. | 2048×2048 px. | “Online shop” profile: 2048×2048 px, square, JPG, white background, 8% margin. |
A few notes on the table:
- Allegro has exceptions by category. In fashion, the thumbnail background can be white or light grey, and the garment or model should fill about 80% of the frame. The “Allegro Fashion” profile covers this (10% margin). Some other categories, such as furniture, plants and vehicles, have their own exceptions to the white background rule, so check your category in the Allegro help.
- One Allegro help page gives 400 px for thumbnails and another gives 500 px. Seller Studio warns below 500 px.
- OLX mentions a “4:3 format” without explaining it, so 4:3 and a white background are our choice. Vinted gives no figures for photo size or file format, so the Vinted photo size in Seller Studio (1200×1600 px) is our default, not a rule.
- Marketplaces change their rules. Each profile in Seller Studio shows the date the requirements were checked and links to the sources.
- Seller Studio also has an “Allegro gallery” profile for photos from no. 2 on (the ratio and background stay) and profiles for Amazon, eBay and Etsy. Amazon needs a white background with the product filling at least 85% of the frame. For Etsy, Seller Studio makes sure the result has no transparency, because Etsy shows it as black.
How to shoot product photos with a phone
Without AI, Seller Studio finds the product by comparing the colours along the photo edges with the rest of the frame. It works best when the background is plain.
- Put the product on a light, smooth surface: a sheet of paper, a bed sheet, a wall or a bare table top. With a patterned tablecloth or several objects in the frame, Seller Studio will not crop the photo.
- Leave some space around the product. A product touching the edge of the photo may be cut off, and Seller Studio flags such photos.
- Show the whole product, but shoot from close. If the product fills only a small part of the original frame, Seller Studio has to enlarge it a lot and the result can look soft.
- Use daylight and focus on the product. Blurry edges are harder to cut out.
- Avoid hard shadows and reflections. The shadow under a product is darker than the background, so Seller Studio counts it as part of the product, which makes the product a little smaller or off centre.
- A white product on a white background is hard, because the colours do not differ. Put it on a darker, plain surface, or turn on AI background removal (see below).
- You can add iPhone photos in HEIC format without converting them first.
Step by step in Seller Studio
1. Add photos and choose a marketplace
Open Seller Studio, drag your photos (JPG, PNG, WebP or HEIC) onto the drop area, pick them from your device, or paste them with Ctrl+V. You can add up to 30 photos at a time, each up to 50 MB. You can choose the marketplace profile right away on the right, or later from the list in the settings.
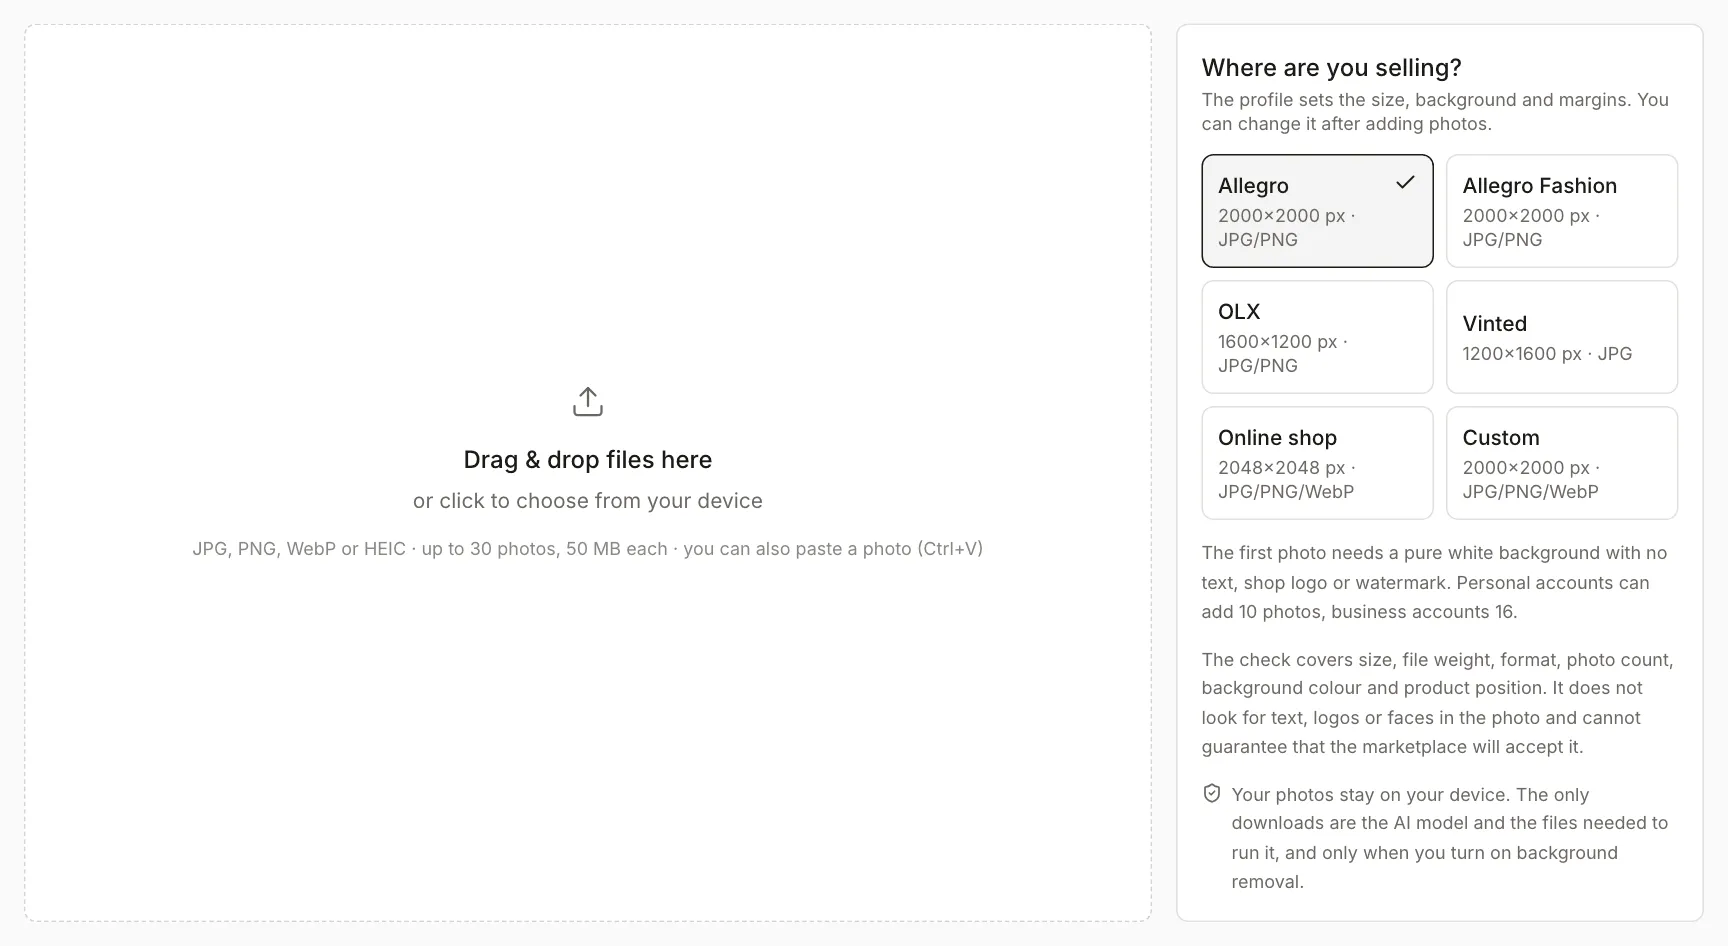
Once you add photos, Seller Studio opens full screen. Close it with the “Close Studio” button or your browser’s back button. The project stays in that browser tab, so you can go back to the page and reopen it. It disappears when you close the tab.
2. White background for product photos, and the margin
On a computer, the photo list is on the left, the preview in the middle and the settings on the right. Drag the edge of the list or the settings panel to change its width, or collapse either panel with the button in its header to give the preview more room.
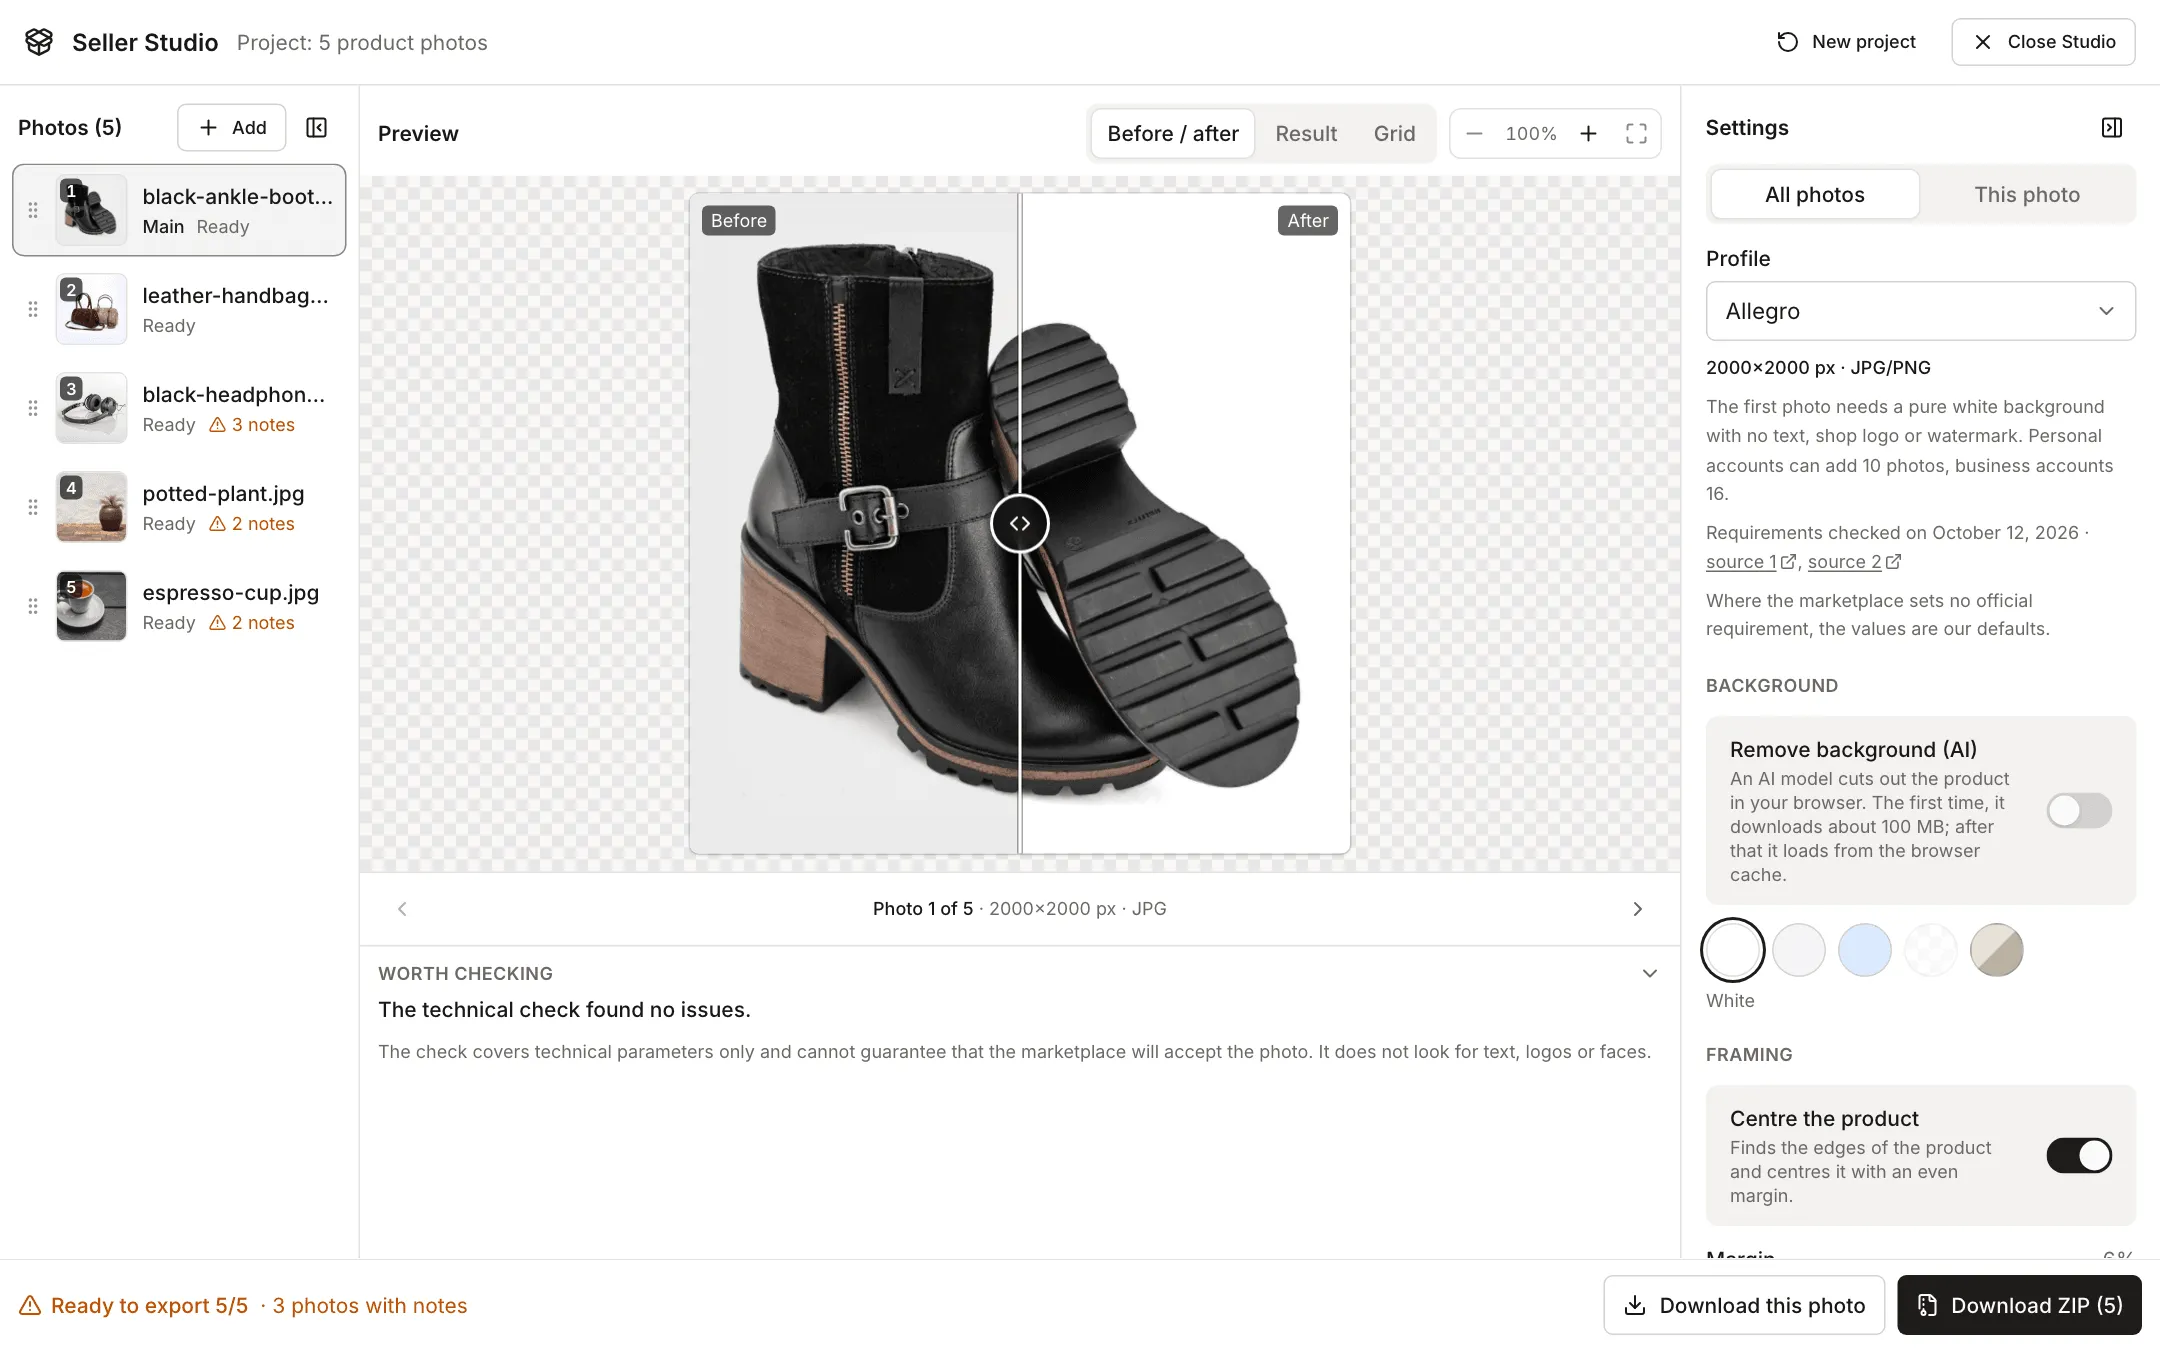
For photos on a plain background, the profile, a white background (the Allegro default) and a margin are enough. Seller Studio finds the product, centres it, and replaces the background connected to the photo edge with white. The shadow under the product stays. Drag the slider in the preview to compare before and after.
Two settings are worth knowing:
- “Remove background (AI)”: a model cuts out the product itself, usually without the shadow, and places it on the background you chose. The first time you turn it on, your browser downloads the model (about 100 MB, and you see the size before it starts), then keeps it in its cache. Nothing is downloaded until you turn the switch on.
- “Margin”: the gap between the product and the edge of the photo. It is 6% in the Allegro profile and 10% in Allegro Fashion.
Under “More settings” you can change brightness, contrast, aspect ratio, long side, file format, quality, the file size limit (the OLX profile has “Fit within 5 MB”), the logo (only in profiles that allow one) and the file name.
3. Review all results in the Grid view
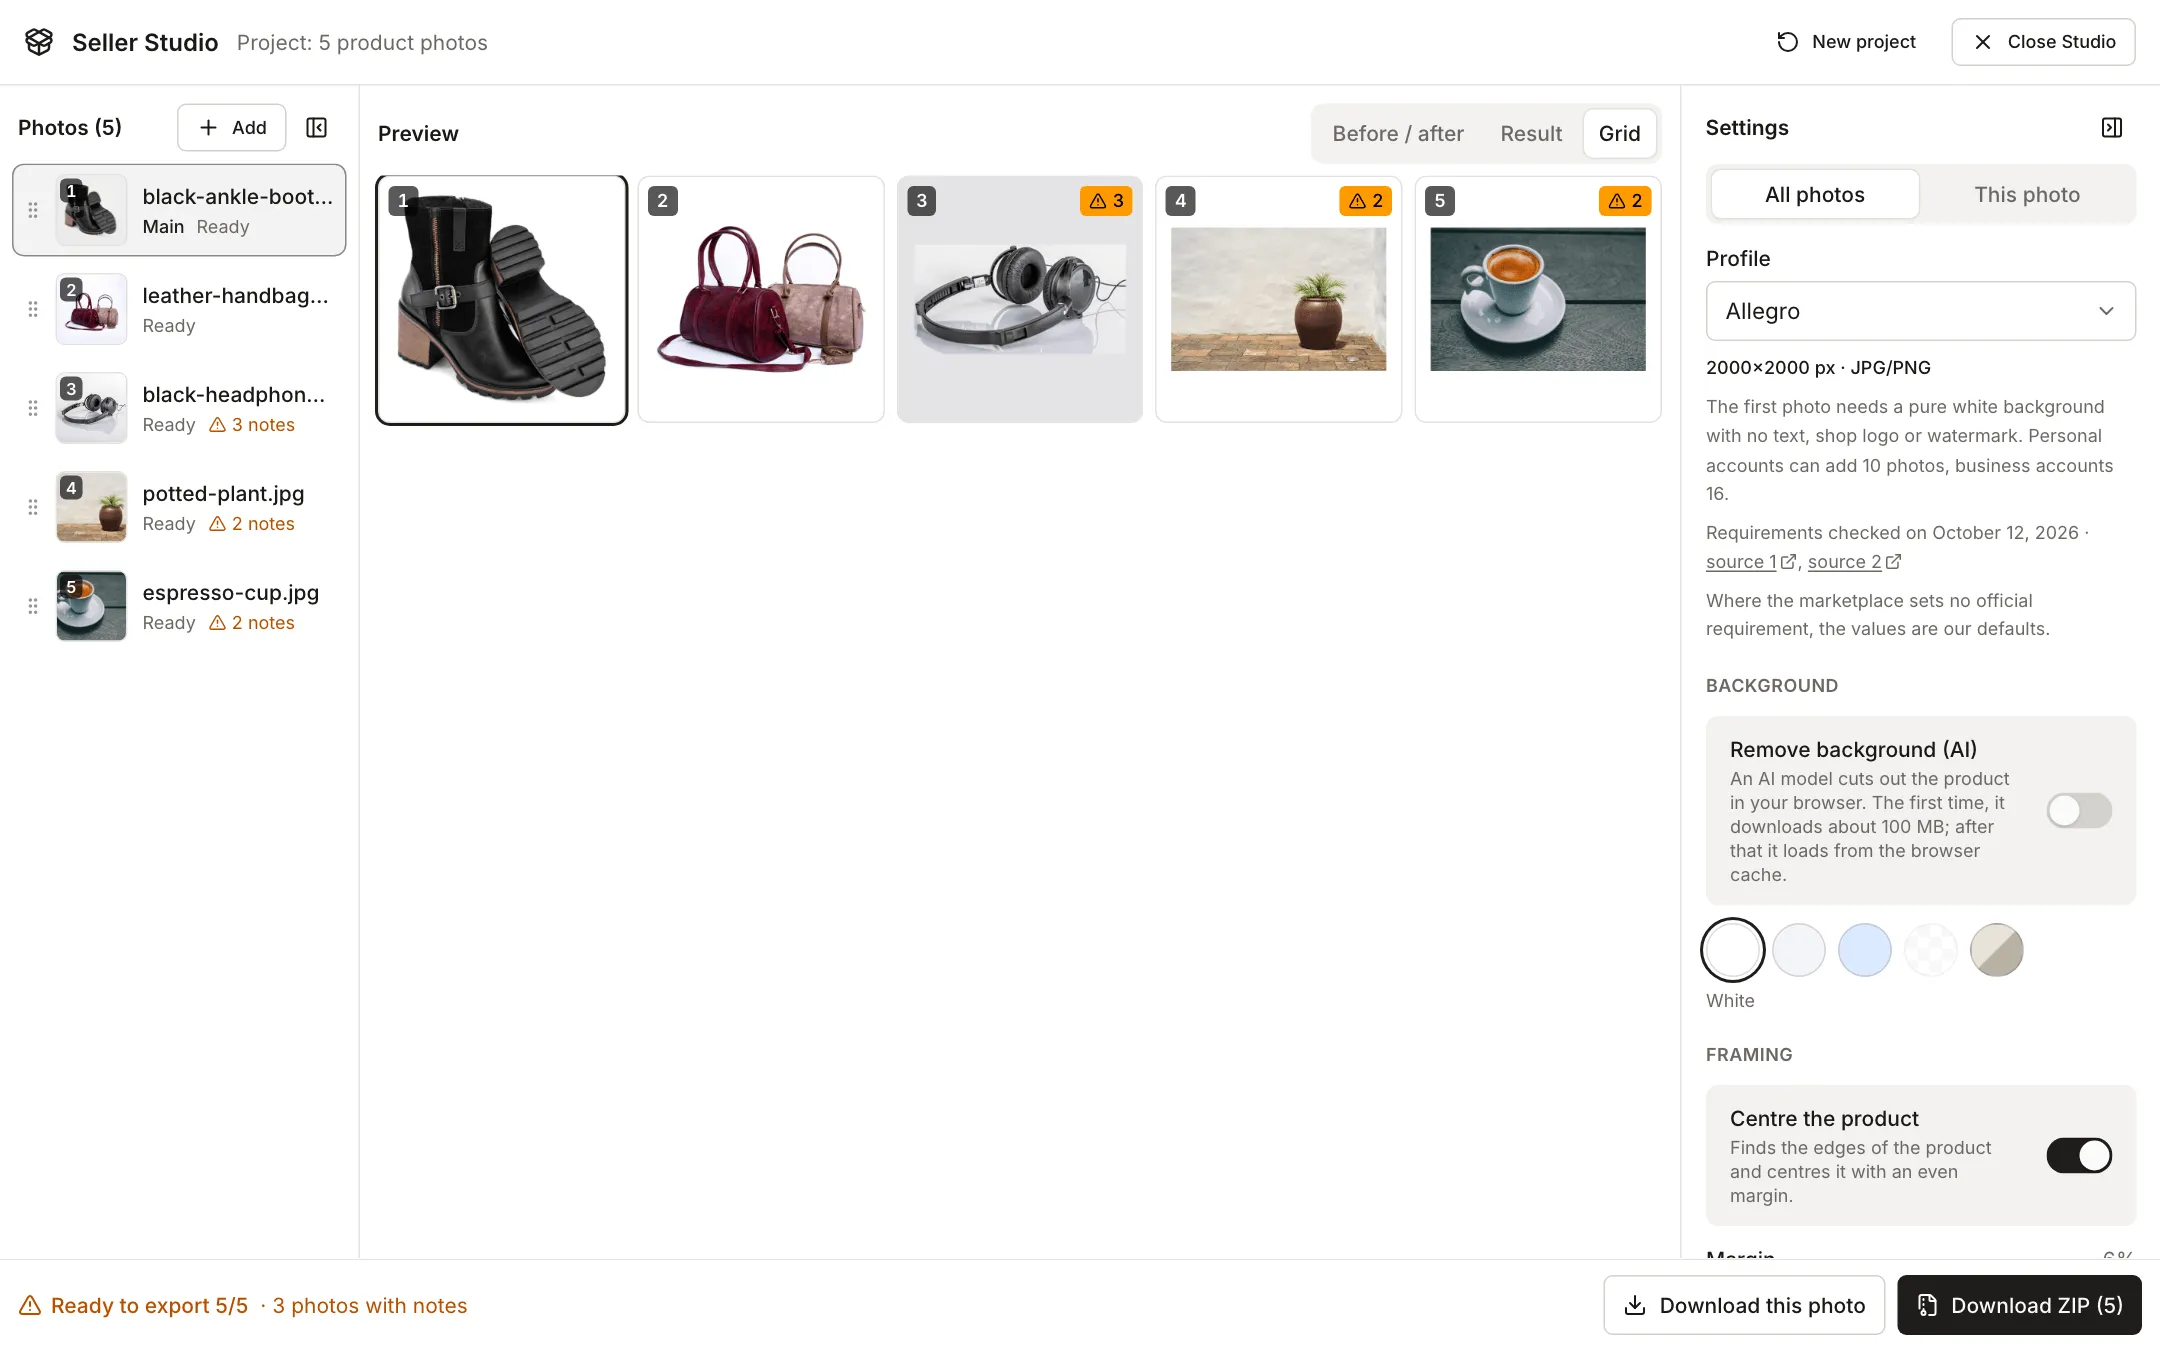
Above the preview you can switch between “Before / after”, “Result” and “Grid”. The grid shows all photos at once, so you can see straight away whether the products have a similar size and background. A photo with notes has an orange badge with a number in the corner.
4. Read the notes in “Worth checking”
Below the preview, Seller Studio lists notes for the selected photo, for example resolution too low, product enlarged a lot, file too large, product at the edge, a background that is not white where the marketplace requires it, and too many photos. You can change the height of this section by dragging. Notes for the whole batch appear above the preview.
5. Fix one photo in the “This photo” tab
Select a photo in the list and open the “This photo” tab in the settings panel. Background removal, centring, margin, background, brightness and contrast change only for that photo, and “Restore batch settings” undoes those changes. If Seller Studio detects the product wrongly, for example on a busy background, click “Adjust crop” and drag the rectangle so it covers the whole product. Seller Studio centres that area with the margin you chose, and “Back to automatic” goes back to detection. You can also rotate the photo by 90° or skip it in the export.
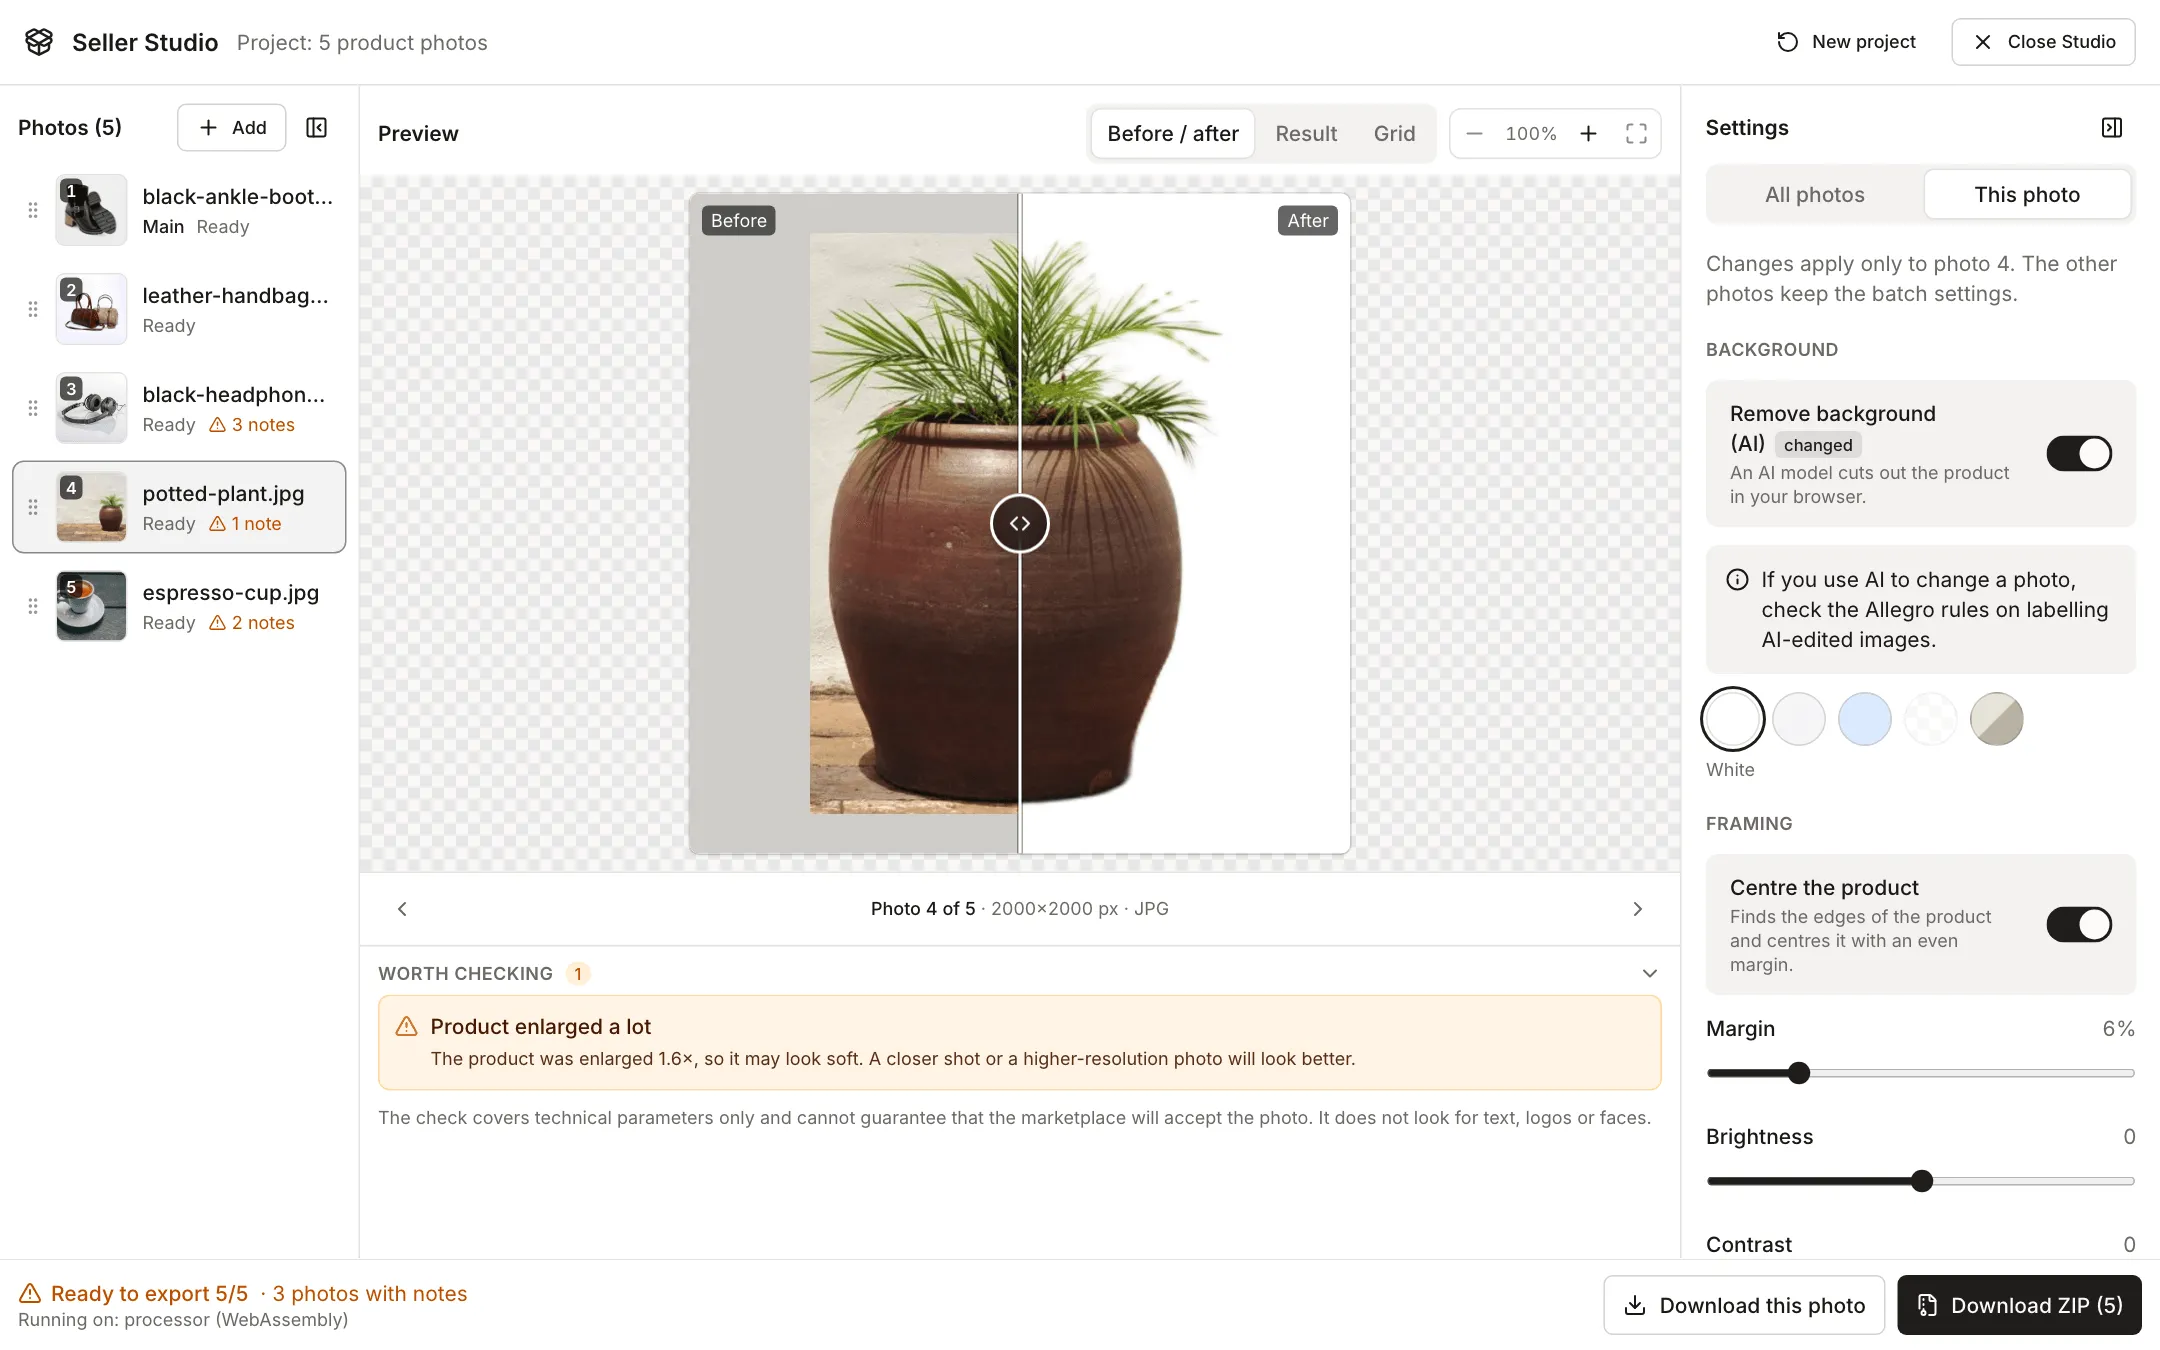
In the screenshot below, the potted plant standing against a plastered wall and on bricks has two notes: “Busy background” and “Background is not white”. Seller Studio could not find the edges of the product reliably, so it did not crop it and placed the whole photo on a white background. Here you need to turn on “Remove background (AI)” for this one photo.
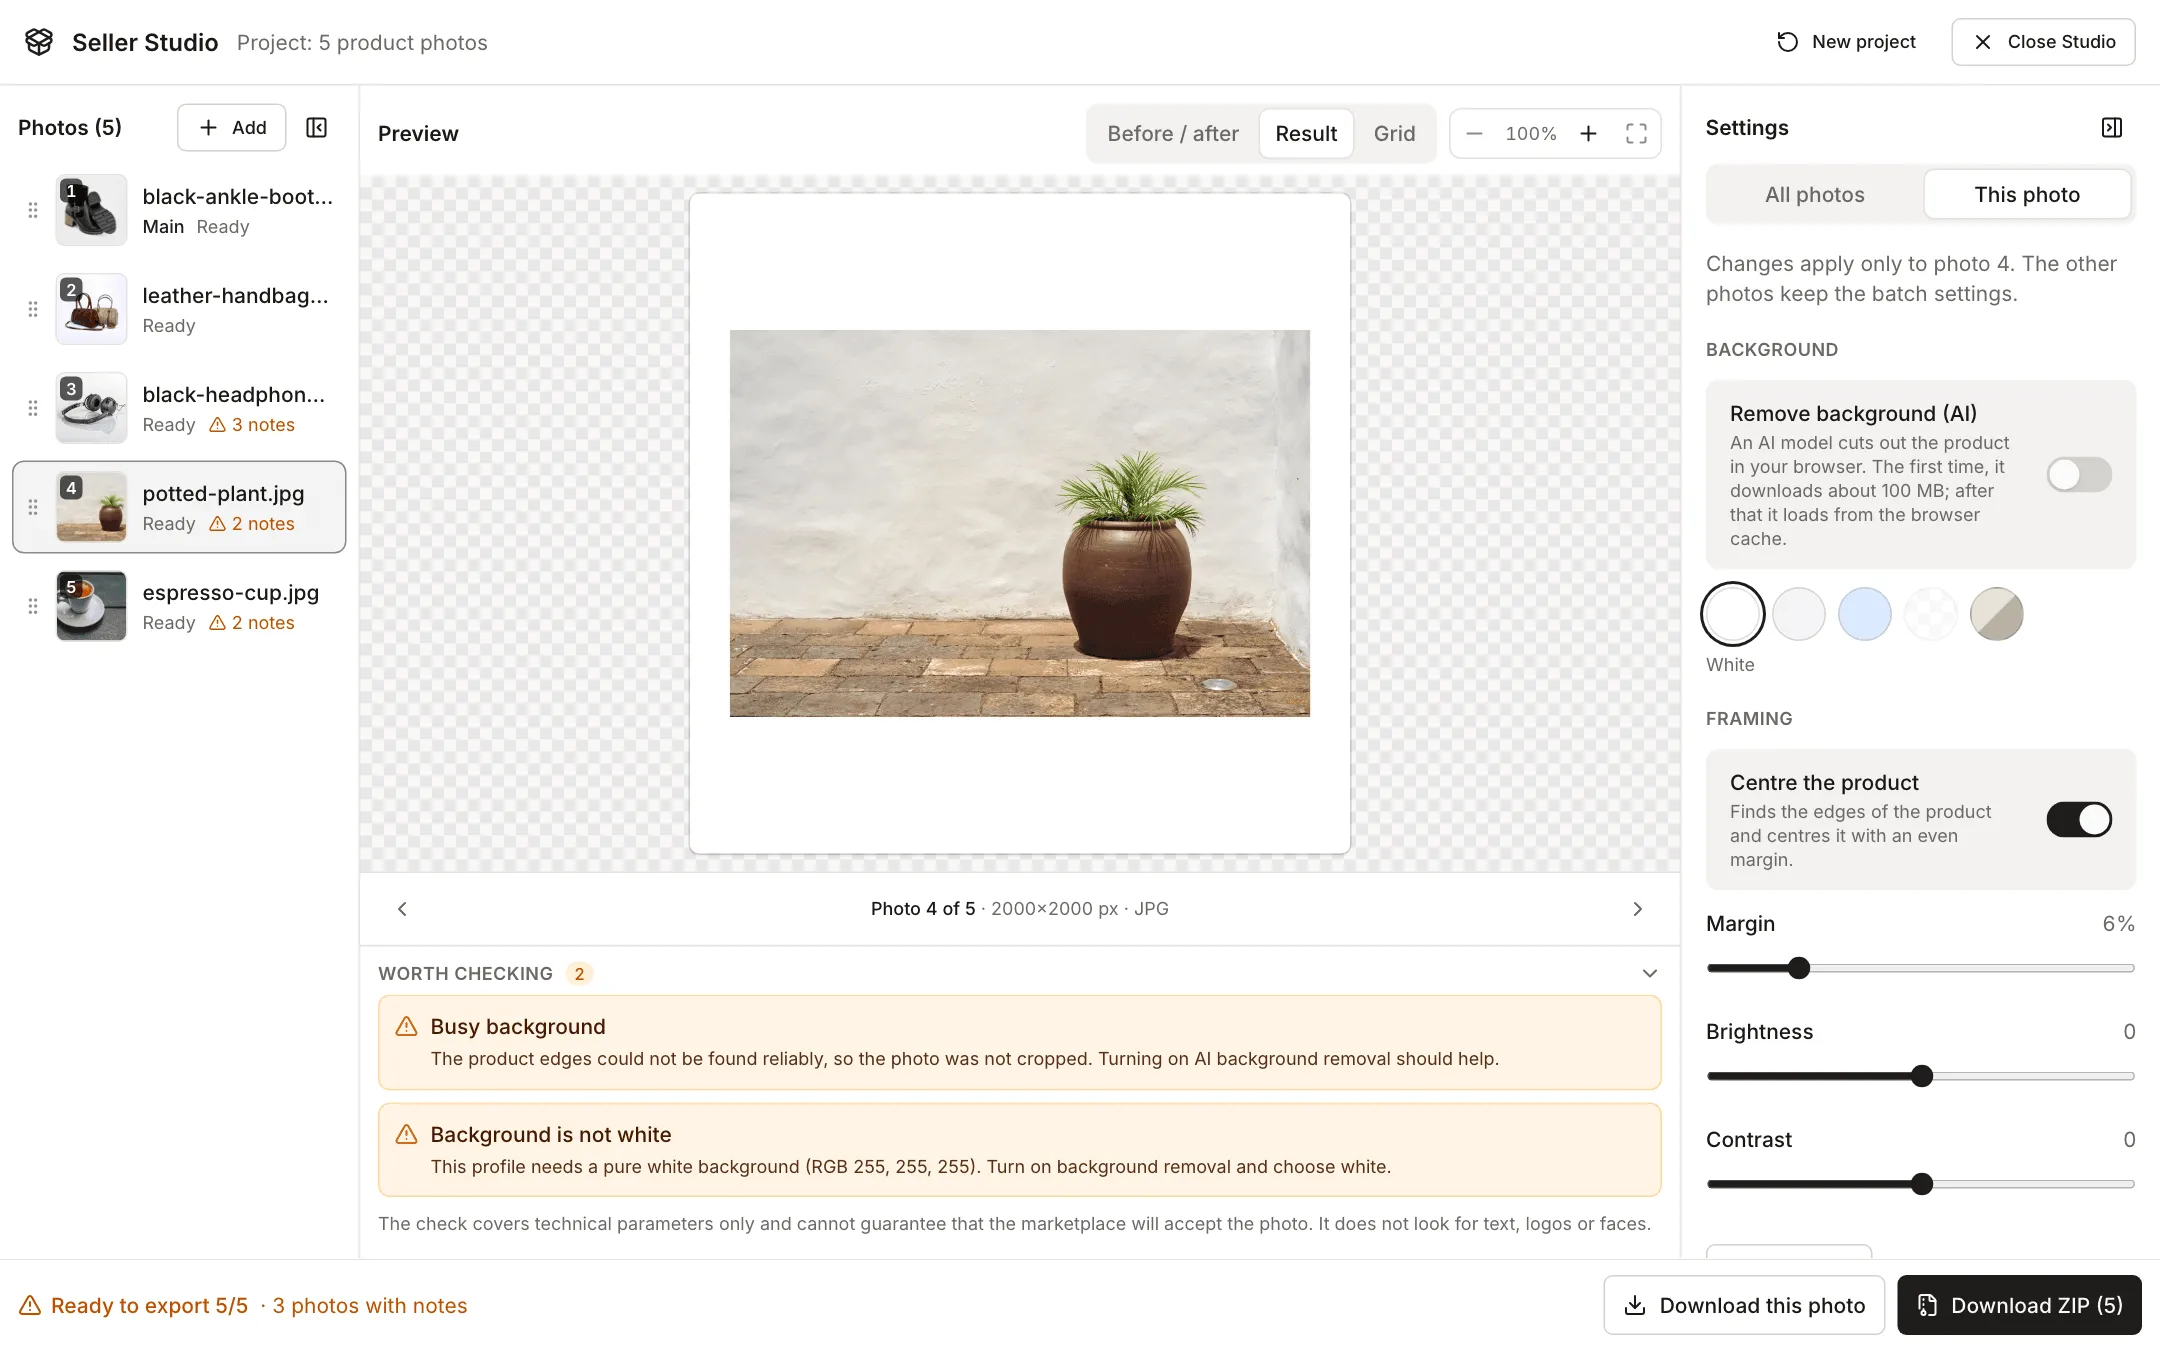
With “Remove background (AI)” turned on for this photo only, the model cut out the pot and the plant and placed them on a white background, and Seller Studio centred the product. Both background notes disappeared. One note remained, “Product enlarged a lot” (1.6×), because the plant filled only a small part of the original frame. The other photos keep the batch settings.
6. Set the order and download the ZIP
Files are numbered in list order, so photo 1 is the main photo (it carries a “Main” label in the list). Drag photos to change the order before you download. On Allegro, photo 1 is the thumbnail and needs the white background, so put your best prepared photo there.
“Download ZIP” saves all the photos you did not skip, and “Download this photo” saves only the selected one. File names look like name-01.jpg, name-02.jpg and so on. You set the start of the name in “More settings”, in the “File name” field. For example, “winter jacket” gives winter-jacket-01.jpg, winter-jacket-02.jpg and a ZIP called winter-jacket-allegro.zip. Without your own name, files are called photo-01.jpg. Seller Studio saves every photo anew, so the output files carry no EXIF data, including GPS location.
Vinted photo size and background: the background stays
The Vinted catalogue rules (UK version) say that photo editing is not allowed. Removing a background is editing, so the Vinted profile keeps the original background. The photo is cropped to a 3:4 ratio and reduced to 1200×1600 px. When Seller Studio finds the product, it places the crop so the whole product stays in the frame. If the product does not fit, it keeps the whole photo and fills the edges with the background colour. If you turn on “Remove background (AI)”, Seller Studio shows a warning. Rules can differ between countries and change over time, so check them for your account. We also do not know whether Vinted counts cropping to a ratio as editing. If you prefer not to crop, choose “Same as photo” for the aspect ratio under “More settings”.
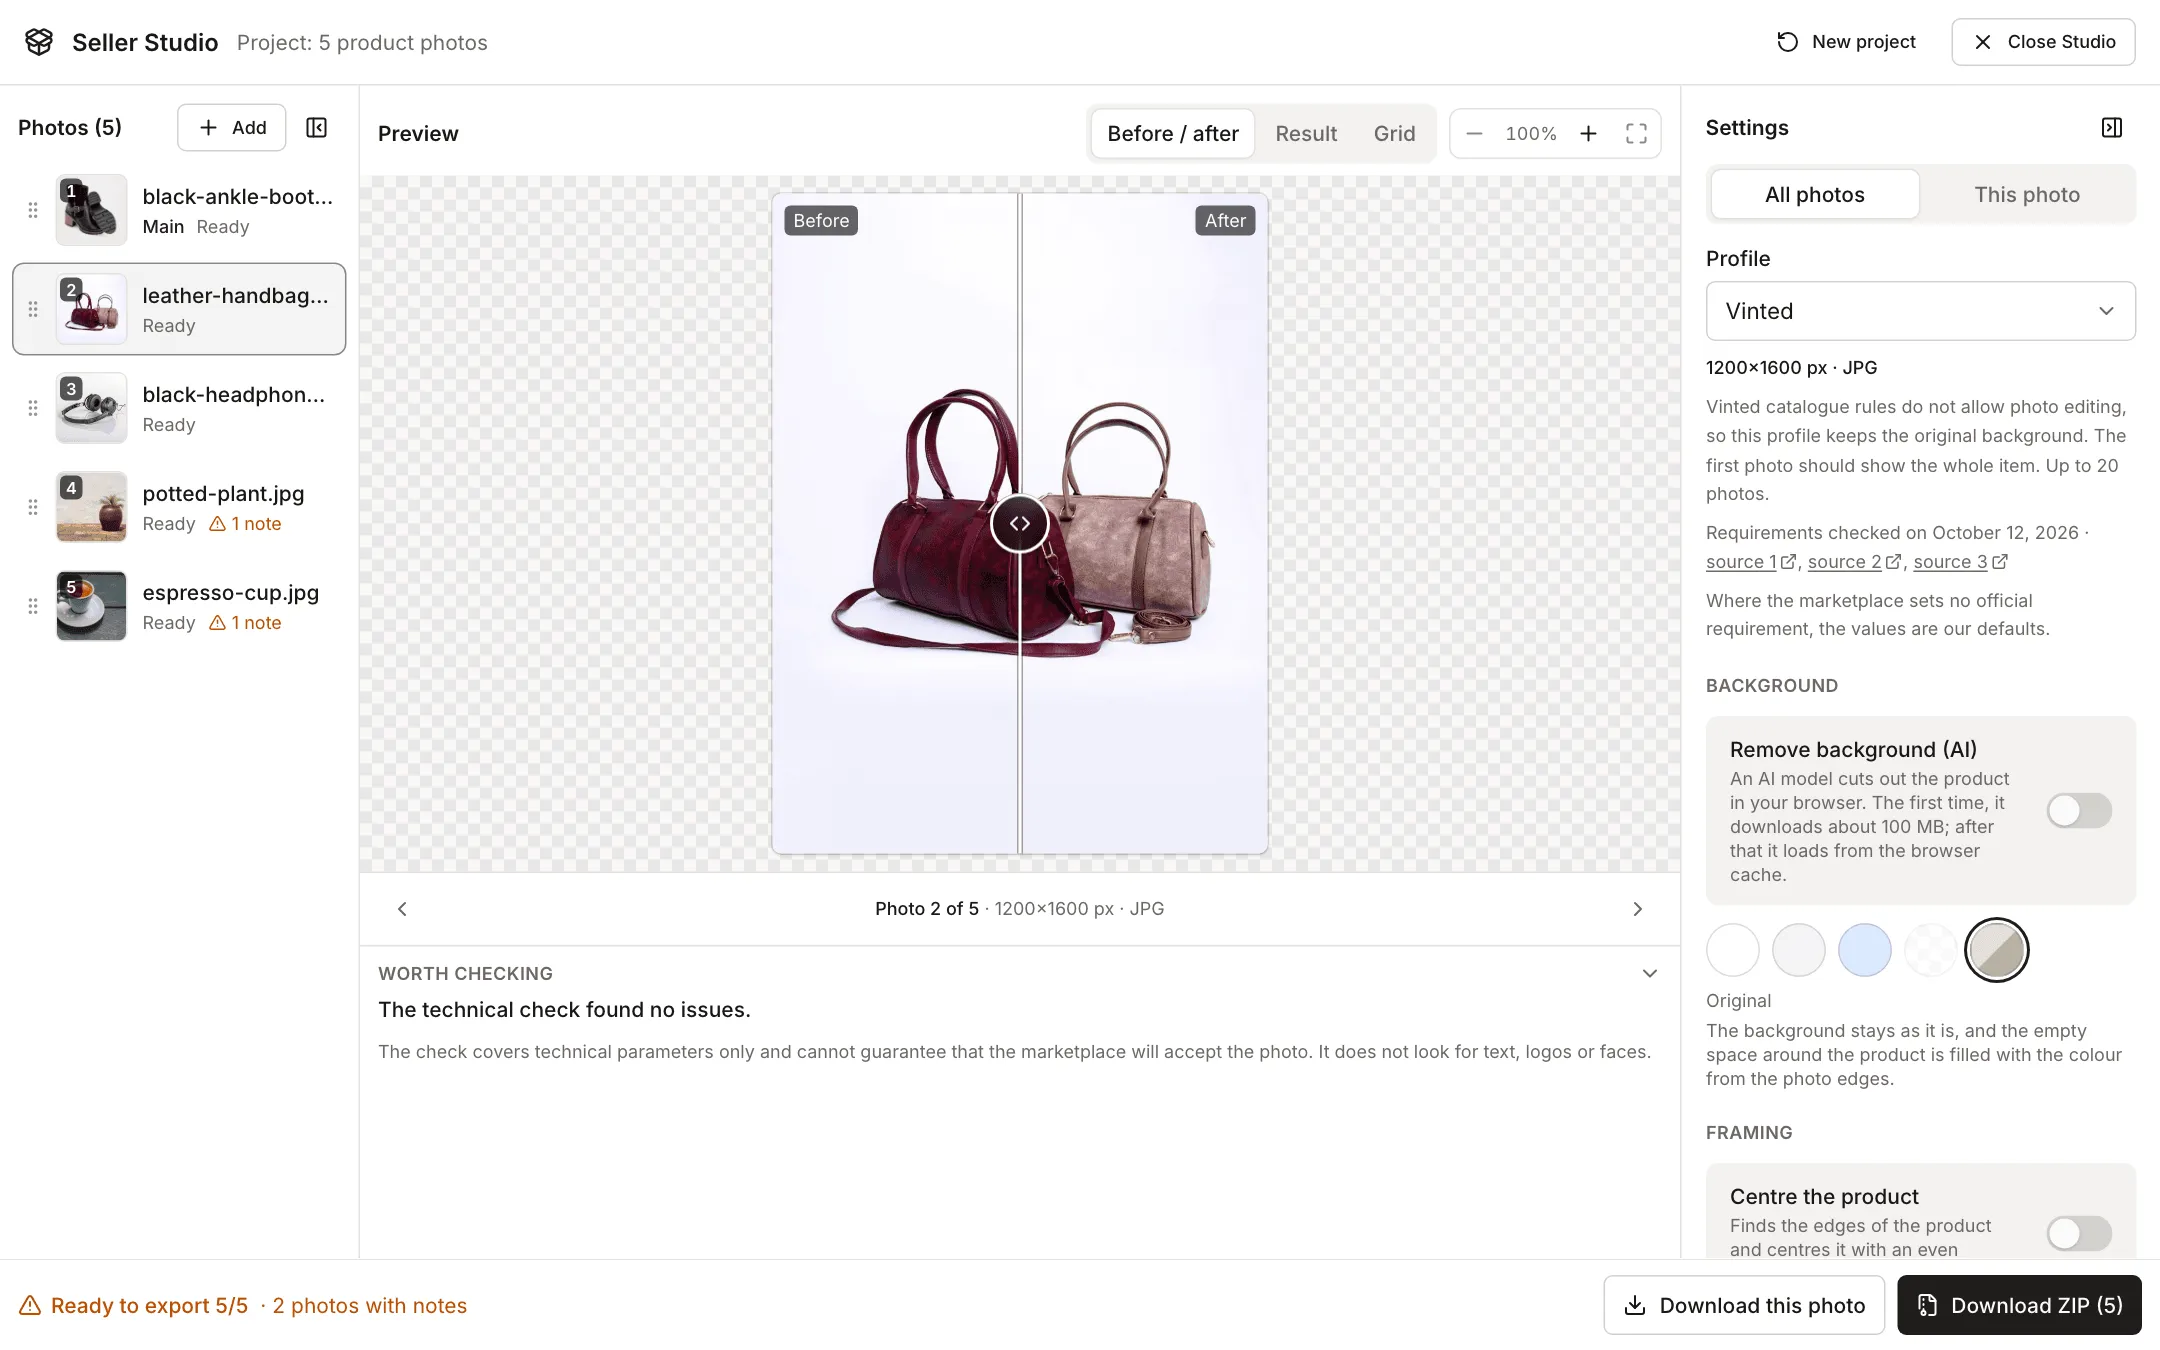
Vinted’s Polish help recommends a neutral background, daylight, no filters, and showing the flaws of the item, so it is worth tidying the background while you shoot.
When detection without AI fails
Without AI, the background stays as it is in the photo when:
- the product does not stand out clearly from the background, for example white mugs on a light grey surface, a pale bottle on a light background or black headphones with a strong reflection on the table. Seller Studio shows the “Product similar to the background” note and leaves the background as it is, so it never cuts away part of the product. The product stays untouched and the rest of the frame is filled with the background colour from the photo,
- the background is busy, such as a patterned tablecloth or several objects. Seller Studio shows the “Busy background” note and does not crop the photo,
- the product fills almost the whole frame and there is nothing to crop.
On Allegro, such a photo also gets the “Background is not white” note, because the thumbnail needs pure white. The bar at the bottom of Seller Studio then shows how many photos have notes.
In these cases, turn on “Remove background (AI)”, ideally only for the problem photo in the “This photo” tab. You can also reshoot the photo on a plain surface.
AI has limits too. Thin parts, glass and shiny surfaces can come out worse, because the mask is made at up to 1024 px and then scaled to the photo. Check the result in the before and after preview. Photos with a long side above 4096 px are reduced so the browser does not run out of memory. Photos are processed one at a time, the selected one first, and the time depends on your device: a graphics card speeds it up, and a processor alone is slower.
What Seller Studio does not check
- The check covers technical parameters: size, file weight, format, photo count, background colour, the product’s position at the edge and whether a logo is on. It does not guarantee that the marketplace will accept a photo.
- Seller Studio does not check text, logos or faces in the photo, and it does not know whether the photo is yours.
- Marketplaces have exceptions by category and change their rules, so check the marketplace help before you publish. For Allegro, the profile warns above 16 photos, although vehicle and property listings allow 40.
- Allegro’s help describes labelling for images generated or substantially changed by AI. It does not say whether this covers removing a background and placing a plain one, and neither do we. If you use AI to change a photo, check the Allegro rules on labelling AI-edited images.
You can also do single steps with separate tools: background remover, compress image to a target size and HEIC to JPG. For photos for your own shop (framing, format, file weight), see How to prepare product photos for an online store, and for the data hidden in phone photos, see What to check before sharing a photo.
The product photos in the screenshots come from Pexels and are used under the Pexels License: ankle boots (José Martin Segura Benites), handbags (Muneeb Malhotra), headphones (Saeed Khokhar), potted plant (Piotr Grzankowski) and espresso cup (Victor Freitas).