How to scan a document with your phone to PDF
A phone and decent light are enough to scan a document. The photo still needs to be straightened, cropped to the page, and saved as a PDF that the recipient can actually read.
- HNarzędzia editorial team
- Published:
A plain photo of a sheet of paper rarely works as a scan. The page sits at an angle, the table shows around it, and there’s a hand shadow in one corner. The JPG from your camera is several megabytes and has the shape of the photo, not of the page. The Document scanner cuts the page out of the photo, straightens it, boosts the contrast, and saves the pages as an A4 PDF. Your photos aren’t uploaded anywhere; everything runs in the browser. How good the scan looks still depends mostly on the photo.
Taking the photo: light, angle, and background
Put the page on a dark, plain surface. The tool doesn’t detect the edges for you. You mark the corners yourself by dragging four handles, and on a dark background they’re easy to see.
Daylight from the side works best. A flash often leaves a bright glare in the middle of the page. Black & white mode copes well with the shadow of your hand or phone: our test photo had an obvious shadow in the bottom left corner, and the black & white scan showed no trace of it (see the screenshot below). This mode compares every pixel with the average brightness around it, so gradual changes in lighting don’t turn into grey patches.
Hold the phone parallel to the page. The tool doesn’t know your document is A4. It takes the scan size from the longer of each pair of opposite sides of the area you marked, so a page photographed at an angle comes out squashed. We tested this with two 3024 × 4032 px (12 MP) photos:
| Photo | Scan size | Proportions (A4 is 1:1.41) | White bands on the PDF page |
|---|---|---|---|
| Page 1, steep angle | 2082 × 2577 px | 1:1.24 | about 18.5 mm at the top and bottom |
| Page 2, smaller angle | 1909 × 2596 px | 1:1.36 | about 6 mm each |
On page 1 the letters are noticeably wider than on paper, and the page doesn’t fill the A4 sheet. The text is still readable, but the tool can’t fix the proportions. Only a new photo, taken from directly above, will.
Let the page fill as much of the frame as possible, with a thin strip of background around it. Before straightening, the photo is scaled down so its longer side is at most 3508 px, and the scan is built from the part covered by the page. In our test, a 12 MP photo gave a scan 2082 px wide, roughly 250 DPI on an A4 page. A small page in the middle of the photo means fewer pixels and softer text.
Corners and scan mode
When you add a photo, the handles start in a default rectangle 6% in from the edges. Drag each one to a corner of the page and the preview next to it shows the straightened result right away. The order of the corners doesn’t matter. Put each handle exactly on the corner or slightly inside it. If it ends up outside the page, a strip of the table stays at the edge of the scan, and in black & white mode it turns black.
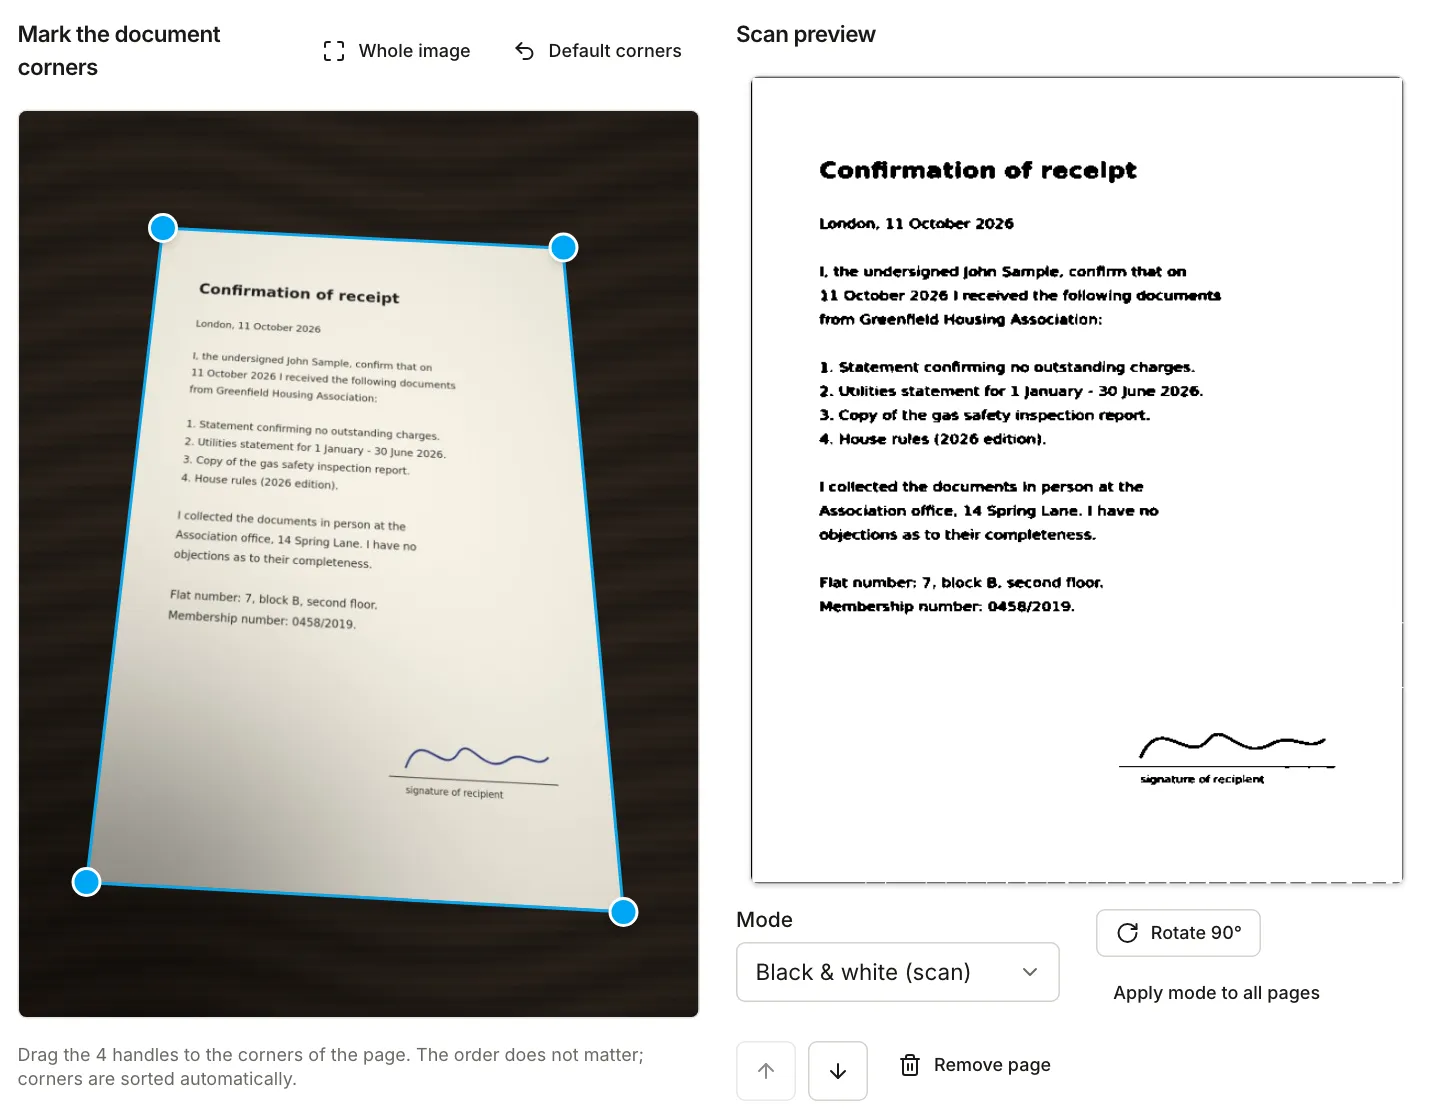
You can choose the mode per page or apply it to all pages. Our two-page test came out like this:
| Mode | How the page is stored in the PDF | PDF size (2 pages) | Use it for |
|---|---|---|---|
| Black & white (scan) | PNG, lossless | 123.6 KB | Letters, contracts, invoices, notes in pen |
| Greyscale | JPG, 85% quality | 1.0 MB | Stamps, pencil, photos in the document |
| Colour | JPG, 85% quality | 938.6 KB | Colour forms, or when the ink or stamp colour matters |
Black & white gives the smallest file and the sharpest text, but it turns every colour into black. The blue signature on our test page came out black. If the recipient needs to see the ink or stamp colour, use colour mode.
Several pages in one PDF
Add photos of all the pages; you can select several files at once. Each photo becomes one page, and the arrows change the order. When you click “Download PDF (A4)”, each page goes on its own A4 sheet (210 × 297 mm), portrait or landscape depending on the scan, with no extra margin around it. There’s no US Letter option, but an A4 PDF prints fine on Letter paper with “fit to page”.
You’ll often need to send the scan together with other files:
- Merge PDF accepts both PDFs and images, so you can combine, say, a filled-in form and a scanned attachment into one document.
- JPG to PDF helps when you already have cropped images, such as pages saved from the scanner as JPG (several pages download as a ZIP).
File size: when to compress
A black & white scan usually doesn’t need compressing. After Compress PDF at the “Recommended” level, our 123.6 KB file would have been 139 KB, so the tool kept the original. Pages stored as PNG are already small, and compression turns them into JPG.
A colour scan is a different story. The same document in colour mode was 938.6 KB, and 129.4 KB after “Recommended” compression (110 DPI, 70% JPEG quality). The pages were then 909 × 1285 px, which is fine for reading on screen. If someone will print the document, use “Light” (150 DPI) instead. Email attachment limits and what to do before you hit send are covered in How to prepare a PDF for email.
Making the text searchable with OCR
A scan is made of page images. You can’t select, copy, or search the text. If you need to, run the PDF through OCR PDF. On the first page of our black & white scan, OCR recognised 94 words with an average confidence of 95%. The only mistakes were three capital letters “I” read as a vertical bar “|”. That was clear printed text, though. Handwriting and small, blurry print come out much worse. Why you can’t select text in a PDF explains PDFs without a text layer in more detail.
Before you send it
Open the finished PDF and look at every page at 100% zoom. Check that all the pages are there and in the right order, that small print, dates, and numbers are readable, and that no bit of table or finger is left at the edges. If the document still needs your signature and you’d rather not print it, see How to sign a PDF without printing it.