Images & graphics
Image too large to upload: file size, pixels and format
An upload form can reject a photo for three different reasons: the file is too heavy, the dimensions are wrong, or the format is not accepted. Each one has a different fix, so first work out which rule the file breaks.
- HNarzędzia editorial team
- Published:
“File too large” usually refers to file size. Some forms also check pixel dimensions or accept JPG only, and lowering the quality will not help if the real problem is a HEIC file.
File size, dimensions and format are separate requirements
| Requirement | How forms phrase it | What it measures | What you change |
|---|---|---|---|
| File size | “max 200 KB”, “up to 2.5 MB” | how many bytes the file takes up | compression quality, dimensions, format |
| Dimensions | “at least 492×633 px”, “longest side 1920 px max” | pixels across and down | resizing, cropping |
| Format | “JPG, PNG”, “.jpg only” | file type | conversion, e.g. HEIC to JPG |
They affect each other, but one does not replace another. A 1200×900 px photo can weigh 150 KB or 1.5 MB depending on the format and quality setting. Sizes in millimeters, such as 35×45 mm, describe the aspect ratio and print size and say nothing about the file size.
KB, KiB and MB
In upload limits, 1 KB usually means 1,000 bytes and 1 MB means 1,000,000 bytes. Some software counts in units of 1,024 bytes (KiB and MiB) but still labels them KB and MB. Windows File Explorer does this, while Finder on macOS counts in units of 1,000. That is why the same file can show slightly different sizes in two programs.
| Limit | Counted in 1,000 B units | Counted in 1,024 B units |
|---|---|---|
| 200 KB | 200,000 B | 204,800 B |
| 2.5 MB | 2,500,000 B | 2,621,440 B |
A file under 200,000 bytes fits a 200 KB limit whichever way the form counts. The Image to target size tool counts 1 KB as 1,000 bytes, so a result under the limit there is also safe for a form that counts in 1,024-byte units. Our image compressor and other image tools show sizes in 1,024-byte units, so they report a slightly smaller number of KB for the same file.
Leave a few percent of headroom if the form has one limit for all attachments together, or if the file will be edited again, for example placed in a PDF. If a form rejects a file that is just under the limit, set the limit a few KB lower.
How to read the upload requirements
Look for four things: maximum file size, minimum or maximum dimensions, accepted formats and aspect ratio. They are usually in the field description, the application instructions or the error message.
An example from Poland: a photo for an online ID card application must be at least 492×633 px, no larger than 2.5 MB, and have the proportions of a 35×45 mm photo (gov.pl, in Polish, checked October 2026). This form sets a minimum for dimensions and a maximum for file size at the same time. You can make the file lighter, but not smaller than 492×633 px. The passport photo maker produces a photo in these proportions.
If a form lists only a file size, the dimensions are up to you. If it lists only maximum dimensions, resize to that value and check whether the form accepts the file.
What to change first: format, then dimensions, then quality
- Format. Convert HEIC to JPG. A photo saved as PNG is usually worth saving as JPG too: PNG compresses photos losslessly, so the file is much heavier. Choose WebP only if the form lists it.
- Dimensions. If the photo has far more pixels than needed, scale it down while respecting the form’s minimum. If the form requires an aspect ratio, crop the image first.
- Quality. Finally, set the size limit in Image to target size. The tool tries qualities between 30% and 95% and checks the actual file size after each attempt.
Squeezing a very large photo into a small limit with quality alone takes heavy compression, and blocky artifacts become visible. After scaling down, the same photo fits the limit at a higher quality.
Example: a 4000×3000 px test file and a 200 KB limit
For this example we used a synthetic 4000×3000 px test file (12 MP) with a sky gradient, “hills” and fine grain-like noise. It did not come from a camera. Saved as a quality 92 JPG, it weighs 2.97 MB. The same pixels saved as PNG take 20.9 MB.
We measured the sizes below by saving the file with the sharp library. Browsers encode JPG a little differently, so the tool may show slightly different numbers.
| Dimensions | JPG quality | File size |
|---|---|---|
| 4000×3000 px | 80 | 1.23 MB |
| 4000×3000 px | 60 | 683 KB |
| 4000×3000 px | 40 | 440 KB |
| 1600×1200 px | 80 | 248 KB |
| 1200×900 px | 80 | 159 KB |
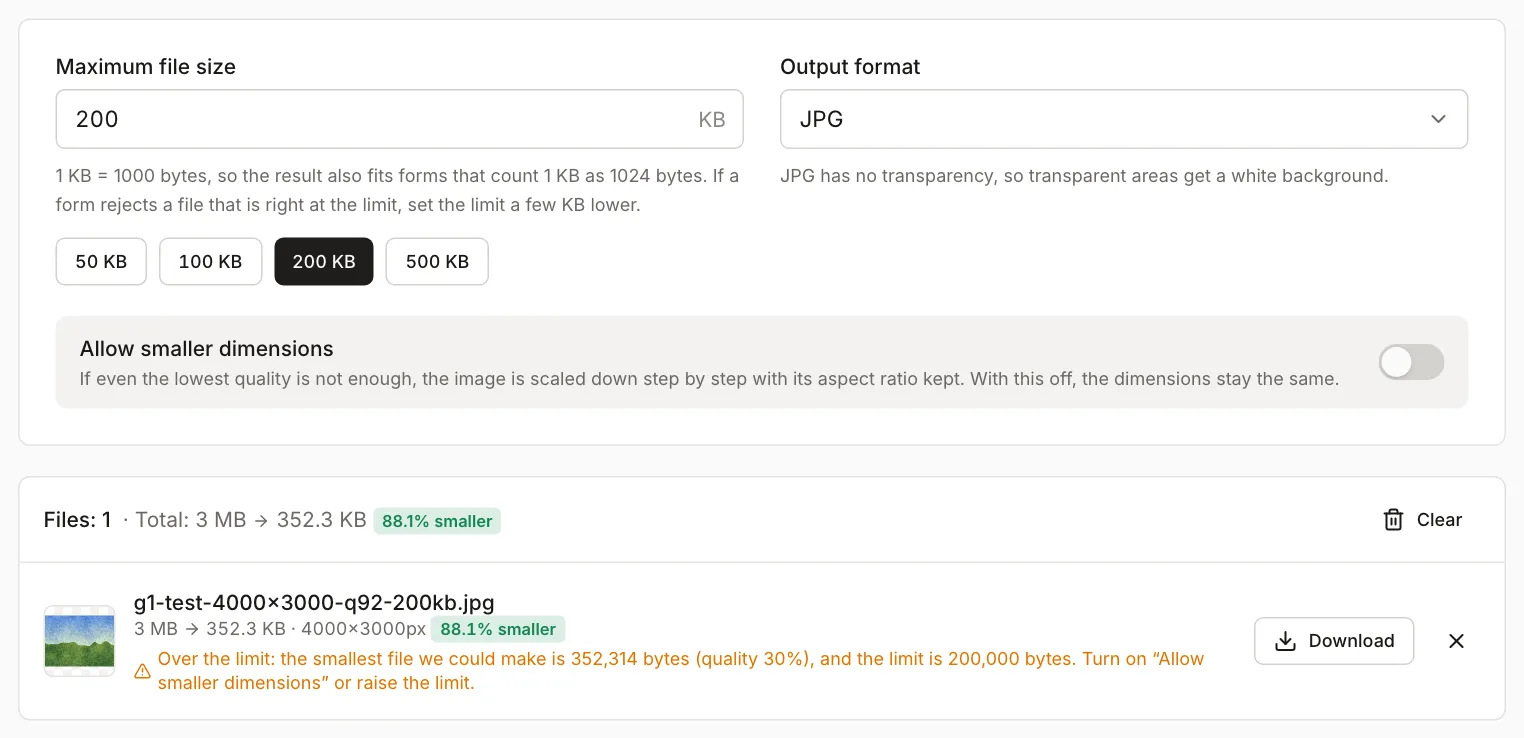
At full size, even quality 40 produced a file more than twice the 200 KB limit. We then loaded the file into Image to target size in Chromium. The tool reports the result size in bytes:
| File and settings | Result |
|---|---|
| 4000×3000 px, 200 KB limit, dimensions unchanged | over the limit, smallest file 352,314 B (quality 30%) |
| 4000×3000 px, 200 KB limit, “Allow smaller dimensions” | 196,590 B, 2434×1825 px, quality 37% |
| resized beforehand to 1600×1200 px, 200 KB limit | 199,956 B, 1600×1200 px, quality 69% |
“Allow smaller dimensions” scales the photo down only until it fits the limit at the lowest quality, then raises the quality as far as it can. The result keeps a lot of pixels but has low quality. If you know what dimensions you need, resize the photo first in the image resizer. In the example, the 1600×1200 px file fit the same limit at quality 69%, where compression artifacts are much less visible than at 37%.
With a 2.5 MB limit, like the Polish ID card form, this file needs no resizing. The tool fit it at quality 84% (2.19 MB, still 4000×3000 px).
When to reduce the dimensions
Scale the image down when:
- lowering the quality alone is not enough, as in the example above,
- at the quality needed to fit the limit, you can see blocks, soft edges or banding in gradients,
- the form sets maximum dimensions.
Do not go below the form’s minimum dimensions, and do not enlarge small photos: extra pixels add no detail and make the file heavier. In the image resizer you can enter exact pixel dimensions, and “Do not enlarge smaller images” prevents accidental upscaling.
If the photo has unnecessary background or empty margins, crop them first. Cropping removes pixels, and the part you keep loses no detail.
iPhone photos in HEIC format
iPhones save photos as HEIC by default. Many forms accept only JPG or PNG and reject HEIC whatever its size. Image to target size also accepts only JPG, PNG and WebP, so convert HEIC files first with HEIC to JPG. If the JPG is still too heavy, set a limit in Image to target size.
To make the iPhone save JPG from now on, open Settings, tap Camera, then Formats, and choose Most Compatible (Apple Support, checked October 2026). This applies to new photos only.
Transparency and PNG files
JPG has no transparency. When you save a graphic with a transparent background as JPG, the transparent areas have to be filled with something. With JPG output, Image to target size fills them with white, which is usually fine for a form.
For example, a 1200×1200 px test graphic (a colored circle on a transparent background) weighs 152 KB as PNG. Saved as a quality 85 JPG on white, it weighs 28 KB (measured with sharp).
If the transparency has to stay and the form accepts WebP, choose WebP in Image to target size, which keeps transparency. If you need a PNG, for example a logo for a website, shrink it in the image compressor with the format set to “Same as original”. The compressor then reduces the number of palette colors and keeps the transparency. Screenshots with small text also often look better as PNG, because JPG blurs the edges of letters.
When the limit cannot be reached
If the tool reports that the limit was exceeded, you can turn on dimension reduction, crop the photo to the part you need, or ask whether the organization accepts the file in another form. A very small limit means scaling down a lot. With a 50 KB limit, the tool shrank our test file to 1141×856 px and dropped the quality to 30% (result: 49,168 B).
If you are sending a scan of several pages, combining them into one PDF is usually easier. Our guide on preparing a PDF for email explains how to shrink it.